
Nissan Rogue Owners Manual: Rear-facing child restraint installation using the seat belts

Rear-facing child restraint installation using the seat belts
| WARNING The three-point seat belt with Automatic Locking Retractor (ALR) must be used when installing a child restraint. Failure to use the ALR mode will result in the child restraint not being properly secured. The restraint could tip over or be loose and cause injury to a child in a sudden stop or collision. Also, it can change the operation of the front passenger air bag. For additional information, refer to “Supplemental air bag warning light� in this section. |
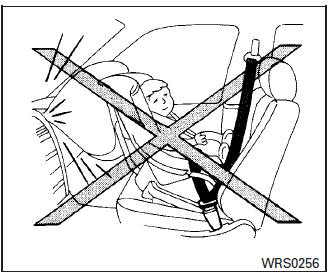
Rear-facing – step 1
For additional information, refer to all Warnings and Cautions in the “Child safety� and “Child restraints� sections before installing a child restraint.
NISSAN does not recommend the use of the lower anchors if the combined weight of the child and the child restraint exceeds 65 lbs (29.5 kg). If the combined weight of the child and the child restraint is greater than 65 lbs (29.5 kg), use the vehicle’s seat belt (not the lower anchors) to install the child restraint. Be sure to follow the child restraint manufacturer’s instructions for installation.
Follow these steps to install a rear-facing child restraint using the vehicle seat belts in the rear seats:
- Child restraints for infants must be
used in the rear-facing direction and
therefore must not be used in the front
seat. Position the child restraint on the seat.
Always follow the restraint manufacturer’s instructions.

Rear-facing – step 2
- Route the seat belt tongue through the child restraint and insert it into the buckle until you hear and feel the latch engage. Be sure to follow the child restraint manufacturer’s instructions for belt routing.

Rear-facing – step 3
- Pull the shoulder belt until the belt is fully extended. At this time, the seat belt retractor is in the ALR mode (child restraint mode). It reverts to the ELR mode when the seat belt is fully retracted.

Rear-facing – step 4
- Allow the seat belt to retract. Pull up on the shoulder belt to remove any slack in the belt.

Rear-facing – step 5
- Remove any additional slack from the seat belt; press downward and rearward firmly in the center of the child restraint to compress the vehicle seat cushion and seatback while pulling up on the seat belt.
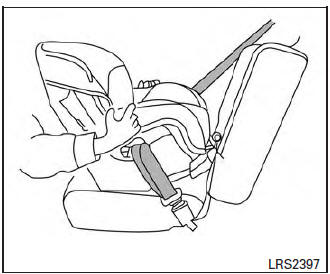
Rear-facing – step 6
- After attaching the child restraint, test it before
you place the child in it. Push it from side
to side while holding the child restraint near
the seat belt path. The child restraint should
not move more than 1 inch (25 mm), from
side to side. Try to tug it forward and check
to see if the belt holds the restraint in place.
If the restraint is not secure, tighten the seat belt as necessary, or put the restraint in another seat and test it again. You may need to try a different child restraint. Not all child restraints fit in all types of vehicles.
- Check to make sure that the child restraint is properly secured prior to each use. If the seat belt is not locked, repeat steps 1 through 6.
After the child restraint is removed and the seat belt fully retracted, the ALR mode (child restraint mode) is canceled.
 Rear-facing child restraint installation using
LATCH
Rear-facing child restraint installation using
LATCH
For additional information, refer to all Warnings
and Cautions in the “Child Safety� and “Child
Restraint� sections before installing a child restraint.
NISSAN does not recommend the use ...
 Forward-facing child restraint installation
using LATCH
Forward-facing child restraint installation
using LATCH
For additional information, refer to all Warnings
and Cautions in the “Child Safety� and “Child
Restraints� sections before installing a child restraint.
NISSAN does not recommend the use ...
Other materials:
Rear-facing child restraint installation using
LATCH
For additional information, refer to all Warnings
and Cautions in the “Child Safety� and “Child
Restraint� sections before installing a child restraint.
NISSAN does not recommend the use of the
lower anchors if the combined weight of the child
and the child restraint exceeds 65 lbs (2 ...
The fuel gauge does not move
Description
Fuel gauge does not move from a certain position.
Diagnosis Procedure
1.CONDUCTING THE COMBINATION METER SELF-DIAGNOSIS MODE
Perform the self-diagnosis mode of combination meter, and then check that the
fuel gauge operates normally.
Refer to MWI-19, "Description".
I ...
Water hose
Exploded View
Water outlet
Hose clamp
Water hose A
Clip
CVT oil warmer
Transaxle assembly
Water hose B
Heater thermostat
Water hose C
: Always replace after every
disassembly.
: N·m (kg-m, ft-lb)
Removal and Installation
REMOVAL
WARNING:
Do not remove the rad ...
