Nissan Rogue Owners Manual: Forward-facing child restraint installation using LATCH
For additional information, refer to all Warnings and Cautions in the ŌĆ£Child SafetyŌĆØ and ŌĆ£Child RestraintsŌĆØ sections before installing a child restraint.
NISSAN does not recommend the use of the lower anchors if the combined weight of the child and the child restraint exceeds 65 lbs (29.5 kg).
If the combined weight of the child and the child restraint is greater than 65 lbs (29.5 kg), use the vehicleŌĆÖs seat belt (not the lower anchors) to install the child restraint. Be sure to follow the child restraint manufacturerŌĆÖs instructions for installation.
Follow these steps to install a forward-facing child restraint in the 2nd row seats using the LATCH system:
- Position the child restraint on the seat. Always follow the child restraint manufacturerŌĆÖs instructions.
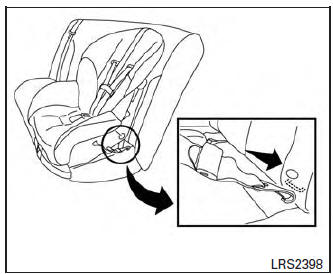
Forward-facing webbing-mounted ŌĆō step 2
- Secure the child restraint anchor attachments to the LATCH lower anchors. Check to make sure the LATCH attachment is properly attached to the lower anchors.
If the child restraint is equipped with a top tether strap, route the top tether strap and secure the tether strap to the tether anchor point. For additional information, refer to ŌĆ£Installing top tether strapŌĆØ in this section. Do not install child restraints that require the use of a top tether strap in seating positions that do not have a top tether anchor.
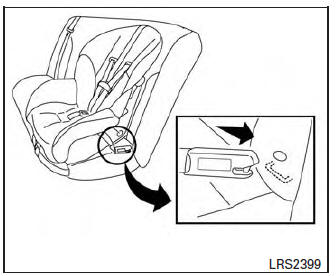
Forward-facing rigid-mounted ŌĆō step 2
- The back of the child restraint should be secured against the vehicle seatback.
If necessary, adjust or remove the head restraint/headrest to obtain the correct child restraint fit. If the head restraint/headrest is removed, store it in a secure place. Be sure to reinstall the head restraint/headrest when the child restraint is removed. For additional information, refer to ŌĆ£Head restraints/headrestsŌĆØ in this section for head restraint/headrest adjustment information.
If the seating position does not have an adjustable head restraint/headrest and it is interfering with the proper child restraint fit, try another seating position or a different child restraint.
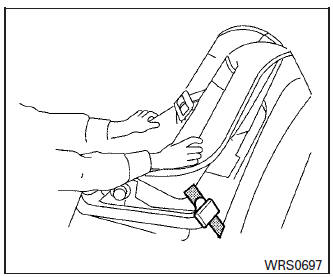
Forward-facing ŌĆō step 4
- For child restraints that are equipped with
webbing-mounted attachments, remove any
additional slack from the anchor attachments.
Press downward and rearward firmly in the center of the child restraint with your knee to compress the vehicle seat cushion and seatback while tightening the webbing of the anchor attachments.
- Tighten the tether strap according to the manufacturerŌĆÖs instructions to remove any slack.
Forward-facing ŌĆō step 6
- After attaching the child restraint, test it before you place the child in it. Push it from side to side while holding the child restraint near the LATCH attachment path. The child restraint should not move more than 1 inch (25 mm), from side to side. Try to tug it forward and check to see if the LATCH attachment holds the restraint in place. If the restraint is not secure, tighten the LATCH attachment as necessary, or put the restraint in another seat and test it again. You may need to try a different child restraint. Not all child restraints fit in all types of vehicles.
- Check to make sure the child restraint is properly secured prior to each use. If the child restraint is loose, repeat steps 3 through 6.
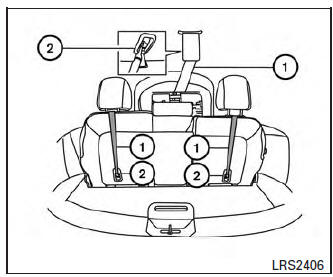
2nd row bench seat
- Top tether strap
- Anchor point
Installing top tether strap
The child restraint top tether strap must be used when installing the child restraint with the LATCH lower anchor attachments.
First, secure the child restraint with the LATCH lower anchors (2nd row bench outboarding seating positions only).
2nd row bench seat
OUTBOARD SEATING POSITIONS
- Remove the head restraint/headrest and store it in a secure place. Be sure to reinstall the head restraint/headrest when the child restraint is removed. For additional information, refer to ŌĆ£Head restraints/headrestsŌĆØ in this section for head restraint/headrest adjustment, removal and installation information.
- Position the top tether strap 1 over the seatback.
- Secure the tether strap to the tether anchor point 2 on the bottom of the seatback behind the child restraint.
- Tighten the tether strap according to the manufacturerŌĆÖs instructions to remove any slack.
CENTER SEATING POSITION
- Remove the head restraint/headrest and store it in a secure place. Be sure to reinstall the head restraint/headrest when the child restraint is removed. For additional information, refer to ŌĆ£Head restraints/headrestsŌĆØ in this section for head restraint/headrest adjustment, removal and installation information.
- Open the top tether anchor 2 cover located on the ceiling.
- Secure the tether strap 1 to the tether anchor point 2 on the ceiling behind the child restraint.
- Tighten the tether strap according to the manufacturerŌĆÖs instructions to remove any slack. Make sure the head restraint/headrest does not contact the top tether strap.
If you have any questions when installing a top tether strap, consult your NISSAN dealer for details.
| WARNING Child restraint anchorages are designed to withstand only those loads imposed by correctly fitted child restraints. Under no circumstances are they to be used to attach adult seat belts, or other items or equipment to the vehicle. Doing so could damage the child restraint anchorages. The child restraint will not be properly installed using the damaged anchorage, and a child could be seriously injured or killed in a collision. |
 Rear-facing child restraint installation using the seat belts
Rear-facing child restraint installation using the seat belts
WARNINGThe three-point seat belt with Automatic
Locking Retractor (ALR) must be used
when installing a child restraint. ...
 Forward-facing child restraint installation
using the seat belts
Forward-facing child restraint installation
using the seat belts
WARNINGThe three-point seat belt with Automatic
Locking Retractor (ALR) must be used
when installing a child restraint. Failure to
use the ALR mode will result in the child
restrain ...
Other materials:
U0141 lost communication (BCM A)
DTC Description
DTC DETECTION LOGIC
DTC
CONSULT screen terms
(Trouble diagnosis content)
DTC detection condition
U0141
LOST COMM (BCM A)
(Lost Communication With Body Control Module
A)
When the ignition switch is turned ON, TCM continues no reception of
the ...
Active engine brake
The Active Engine Brake function adds subtle
deceleration by controlling CVT gear ratio, depending
on the cornering condition calculated
from driverŌĆÖs steering input and plural sensors.
This benefit is for easier traceability and less
workload of adjusting speed with braking at corners.
...
Power window motor
DRIVER SIDE
DRIVER SIDE : Description
Door glass moves UP/DOWN by receiving the signal from main power window and
door lock/unlock switch.
DRIVER SIDE : Component Function Check
1. CHECK FRONT POWER WINDOW MOTOR LH OPERATION
Check front power window motor LH operation with main power window a ...
