Nissan Rogue Service Manual: Luggage trim
Exploded View
WITH THIRD ROW SEAT
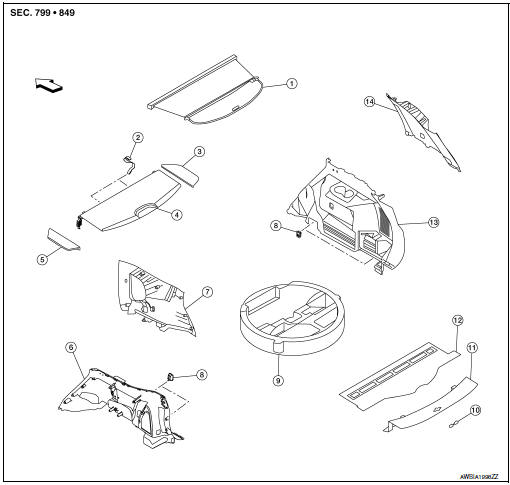
- Tonneau cover (if equipped)
- Strap (LH/RH)
- Luggage floor finisher (RH)
- Luggage floor center finisher
- Luggage floor finisher (LH)
- Luggage side lower finisher (LH)
- Luggage side upper finisher (LH)
- Hooks (LH/RH)
- Luggage storage box
- Luggage rear plate finisher
- Luggage rear plate
- Luggage floor trim
- Luggage side lower finisher (RH)
- Luggage side upper finisher (RH)
 Front
Front
WITHOUT THIRD ROW SEAT
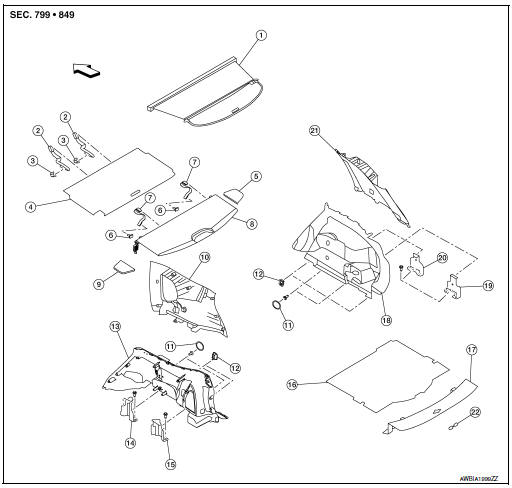
- Tonneau cover (if equipped)
- Front strap (LH/RH)
- Front strap hook (LH/RH)
- Front luggage floor finisher
- Luggage floor finisher (RH)
- Rear strap hook (LH/RH)
- Rear strap (LH/RH)
- Rear luggage floor finisher
- Luggage floor finisher (LH)
- Luggage side upper finisher (LH)
- Bolt covers (LH/RH)
- Hooks (LH/RH)
- Luggage side lower finisher (LH)
- Luggage side lower finisher front bracket (LH)
- Luggage side lower finisher rear bracket (LH)
- Luggage floor trim
- Luggage rear plate
- Luggage side lower finisher (RH)
- Rear luggage side lower finisher bracket (RH)
- Front luggage side lower finisher bracket (RH)
- Luggage side upper finisher (RH)
- Luggage rear plate finisher
Front
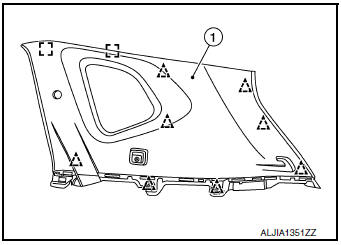
LUGGAGE SIDE LOWER FINISHER
LUGGAGE SIDE LOWER FINISHER : Removal and Installation - With Third Row Seat
REMOVAL
- Release straps and remove luggage floor finisher front and rear.
- Remove luggage rear plate. Refer to INT-37, "LUGGAGE REAR PLATE : Removal and Installation".
- Partially remove back door weatherstrip.
- Partially remove rear door welt (LH/RH).
- Fold third row seatback flat.
- Partially remove the rear door welt. Refer to INT-23, "BODY SIDE WELT : Removal and Installation - Rear Door Welt".
- Remove the luggage side lower finisher hook bolts and hooks.
- Remove the luggage side lower finisher bolt covers (A) then remove bolts.
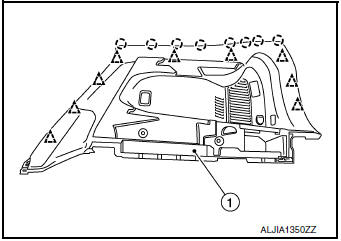
- Release luggage side lower finisher (1) clips and pawls.
 : Clip
 : Pawl
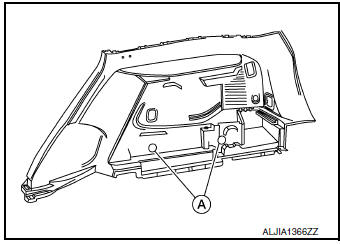
- Disconnect the harness connector from power socket (RH only) and luggage room lamp (RH only) and remove.
INSTALLATION
Installation is in the reverse order of removal.
CAUTION:
- Visually check the clips and pawls for deformation and damage during installation. Replace with new ones if necessary.
- When installing luggage side lower finisher, check that clips and pawls are securely placed in body panel holes.
LUGGAGE SIDE LOWER FINISHER : Removal and Installation - Without Third Row Seat
REMOVAL
- Release straps and remove luggage floor finisher front and rear.
- Remove luggage rear plate. Refer to INT-37, "LUGGAGE REAR PLATE : Removal and Installation".
- Partially remove back door weatherstrip.
- Partially remove rear door welt.
- Remove the luggage side lower finisher hook bolts and hooks.
- Release luggage side lower finisher (1) clips and pawls.
: Clip
: Pawl
- Disconnect the harness connector from power socket (RH only) and luggage room lamp (RH only) and remove.
INSTALLATION
Installation is in the reverse order of removal.
CAUTION:
- Visually check the clips and pawls for deformation and damage during installation. Replace with new ones if necessary.
- When installing luggage side lower finisher, check that clips and pawls are securely placed in body panel holes.
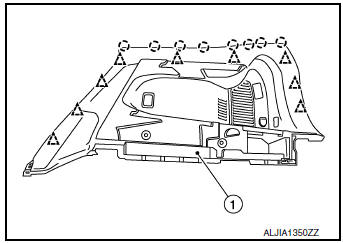
LUGGAGE SIDE UPPER FINISHER
LUGGAGE SIDE UPPER FINISHER : Removal and Installation
REMOVAL
- Remove luggage side lower finisher. Refer to INT-34, "LUGGAGE SIDE LOWER FINISHER : Removal and Installation - With Third Row Seat".
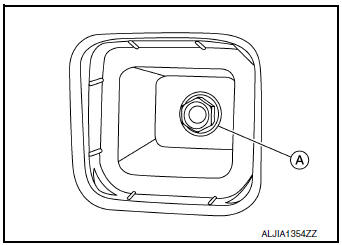
- Remove rear and third row seatbelt d-ring anchor bolt covers, then remove rear and third row seatbelt d-ring anchor bolts (A and B).
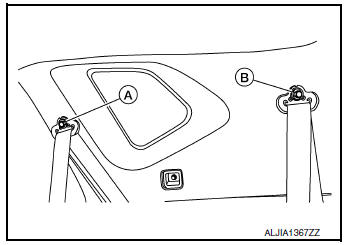
- Remove luggage side upper finisher bolt (A).
- Release clips, then remove luggage side upper finisher (1).
INSTALLATION
Installation is in the reverse order of removal.
CAUTION:
- Visually check the clips for deformation and damage during installation. Replace with new ones if necessary.
- When installing luggage side upper finisher, check that clips are securely placed in body panel holes.
LUGGAGE REAR PLATE
LUGGAGE REAR PLATE : Removal and Installation
REMOVAL
- Release the luggage rear plate front clips (A) using a suitable tool.
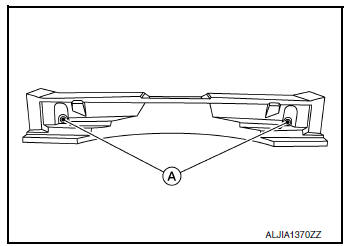
- Release clips and pawls using a suitable tool and remove luggage rear plate (1).
 : Clip
 : Pawl

INSTALLATION
Installation is in the reverse order of removal.
CAUTION:
- Visually check the clips and pawls for deformation and damage during installation. Replace with new ones if necessary.
- When installing luggage rear plate, check that clips and pawls are securely placed in body panel holes.
 Headlining
Exploded View
WITHOUT MOONROOF
Map lamp assembly bracket
Headlining
Assist grip (without coat hanger)
Map lamp assembly
Sun visor holder (LH/RH)
Sun visor (RH)
&nb ...
 Back door finisher
Exploded View
Back door
Access cover
Back door finisher
Clip
Pawl
Metal clip
Removal and Installation
REMOVAL
Using a suitable tool (A) release upper LH most cli ...
Other materials:
U1044 ENG comm circuit
DTC Description
DTC DETECTION LOGIC
DTC No.
CONSULT screen terms
(Trouble diagnosis content)
DTC detecting condition
U1044
ENG COMM CIRCUIT
(Engine communication circuit
A signal voltage of LIN communication between ECM and generator is
excessively
low or e ...
Brake pedal
Exploded View
Rivet
Clevis pin
Brake pedal
Brake pedal pad
Clip
Snap pin
Stop lamp switch
Brake pedal position switch
Removal and Installation
REMOVAL
Remove instrument lower panel LH. Refer to IP-22, "Removal and
Installation". ...
Wiring diagram
ENGINE START FUNCTION
Wiring Diagram
NISSAN VEHICLE IMMOBILIZER SYSTEM-NATS
Wiring Diagram
VEHICLE SECURITY SYSTEM
Wiring Diagram
...
