
Nissan Rogue Service Manual: EVAP canister
Exploded View
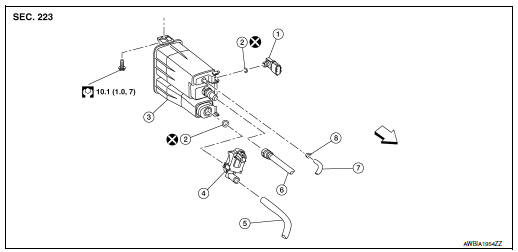
- EVAP control system pressure sensor
- O-ring
- EVAP canister
- EVAP canister vent control valve
- EVAP canister vent control valve hose
- EVAP vent line
- EVAP canister purge hose
- Clamp
 Front
Front
Removal and Installation
NOTE: The EVAP canister vent control valve and EVAP control system pressure sensor can be removed without removing the EVAP canister.
REMOVAL
- Disconnect the EVAP control system pressure sensor harness connector and the EVAP canister vent control valve harness connector.
- Remove EVAP canister filter (1) and place aside (
 ).
).
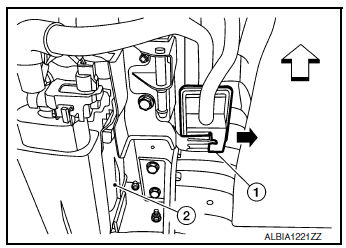
(2) : EVAP canister
: Front
- Disconnect the EVAP canister purge hose, the EVAP vent line, and the EVAP canister vent control valve hose.
- Remove the EVAP canister bolt.
- Remove the EVAP canister from the vehicle.
- Remove EVAP control system pressure sensor and EVAP canister vent control valve (if necessary).
INSTALLATION Installation is in the reverse order of removal.
Inspection
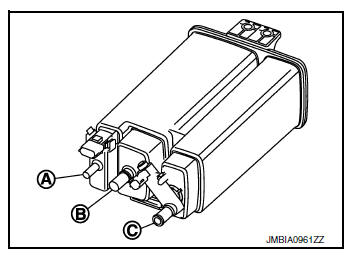
Check EVAP canister as follows:
- Block port (B).
- Blow air into port (A) and check that it flows freely out of port (C).
- Release blocked port (B).
- Apply vacuum pressure to port (B) and check that vacuum pressure exists at the ports (A) and (C).
- Block port (A) and (B).
- Apply pressure to port (C) and check that there is no leakage.
 Fuel tank
FWD
FWD : Exploded View
Fuel filler cap
Grommet
Fuel filler tube
Cover
Clamp
Fuel filler hose
Clamp
Vent hose
Fuel tank p ...
 EVAP canister vent control valve
Exploded View
EVAP control system pressure sensor
O-ring
EVAP canister
EVAP canister vent control valve
EVAP canister vent control valve hose
EVAP vent line
EVAP canister pu ...
Other materials:
Air bag diagnosis sensor unit
Exploded View
Diagnosis sensor unit
Front
Removal and Installation
WARNING:
Before servicing the SRS, turn ignition switch OFF, disconnect
both battery terminals then wait at
least three minutes.
Before disconnecting the air bag diagnosis sensor unit harness
...
Service data and specifications (SDS)
Steering Wheel
Steering Angle
Steering Column
STEERING COLUMN LENGTH
STEERING COLUMN ROTATING TORQUE
TILT MECHANISM OPERATING RANGE
Steering Gear
STEERING OUTER SOCKET AND INNER SOCKET
INNER AND OUTER SOCKET LENGTH
RACK STROKE
RACK SLIDING FORCE
...
Unit disassembly and assembly
FRONT COMBINATION LAMP
Exploded View
Front combination lamp
Parking (side marker) lamp bulb socket
Headlamp (low beam) bulb
Plastic cover
Headlamp (high beam) bulb
Turn signal lamp bulb socket
Disassembly and Assembly
DISASSEMBLY
Remove front combinat ...
