Nissan Rogue Service Manual: Unit disassembly and assembly
FRONT COMBINATION LAMP
Exploded View
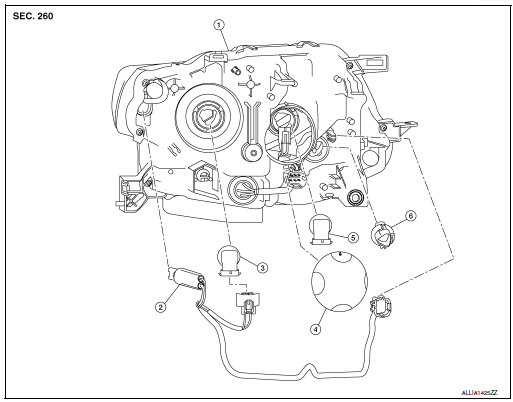
- Front combination lamp
- Parking (side marker) lamp bulb socket
- Headlamp (low beam) bulb
- Plastic cover
- Headlamp (high beam) bulb
- Turn signal lamp bulb socket
Disassembly and Assembly
DISASSEMBLY
- Remove front combination lamp. Refer to EXL-119, "Removal and Installation".
- Rotate the headlamp (low beam) bulb counterclockwise and remove.
- Disconnect the harness connector from headlamp (low beam) bulb.
- Remove plastic cover.
- Rotate the headlamp (high beam) bulb counterclockwise and remove.
- Disconnect the harness connector from headlamp (high beam) bulb.
- Rotate the parking (side marker) lamp bulb socket counterclockwise and remove.
- Remove the parking (side marker) lamp bulb from the bulb socket.
- Rotate the turn signal lamp bulb socket counterclockwise and remove.
- Remove the turn signal lamp bulb from the bulb socket.
ASSEMBLY
Assembly is in the reverse order of disassembly.
REAR COMBINATION LAMP
Exploded View
- Rear combination lamp
- Turn signal lamp bulb
- Tail lamp bulb
- Stop lamp bulb
- Rear combination lamp harness
Disassembly and Assembly
DISASSEMBLY
- Remove rear combination lamp. Refer to EXL-127, "Removal and Installation".
- Rotate the stop lamp bulb socket counterclockwise and remove.
- Remove the stop lamp bulb from the bulb socket.
- Rotate the tail lamp bulb socket counterclockwise and remove.
- Remove the tail lamp bulb from the bulb socket.
- Rotate the turn signal lamp bulb socket counterclockwise and remove.
- Remove the turn signal lamp bulb from bulb socket.
ASSEMBLY
Assembly is in the reverse order of disassembly.
CAUTION: After installing, be sure to install the bulb sockets securely to ensure watertightness.
 Removal and installation
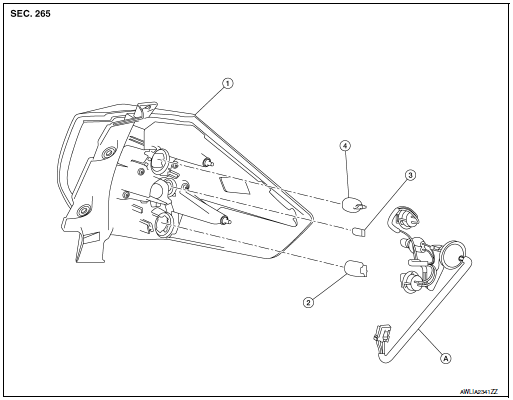
FRONT COMBINATION LAMP
Exploded View
Front fender
Front combination lamp
Clip
Removal and Installation
REMOVAL
Remove front bumper fascia. Refer to EXT-17, "Removal an ...
 Service data and specifications (SDS)
Bulb Specifications
*: Always check with the Parts Department for the latest parts info. ...
Other materials:
Engine compartment check locations
Engine compartment check locations
QR25DE engine
Engine coolant reservoir
Engine oil filler cap
Brake fluid reservoir
Battery
Air cleaner
Fuse/Fusible link box
Radiator cap
Engine oil dipstick
Drive belt location
...
SRS air bag warning lamp does not turn off
AIR BAG Warning Lamp Does Not Turn Off
1.CHECK CONDITION OF AIR BAG MODULE
Inspect for any deployed air bag modules or seat belt pre-tensioners.
Are any air bag modules or seat belt pre-tensioners deployed?
YES >> Refer to Frontal collision: SR-5, "FOR FRONTAL COLLISION : When SRS i ...
Inspection and adjustment
ADDITIONAL SERVICE WHEN REPLACING CONTROL UNIT
ADDITIONAL SERVICE WHEN REPLACING CONTROL UNIT : Special Repair
Requirement
INITIALIZATION PROCEDURE
Moonroof
If the moonroof does not open or close automatically, use the following
procedure to return moonroof operation
to normal.
Tu ...
