Nissan Rogue Service Manual: Third row seats
Exploded View
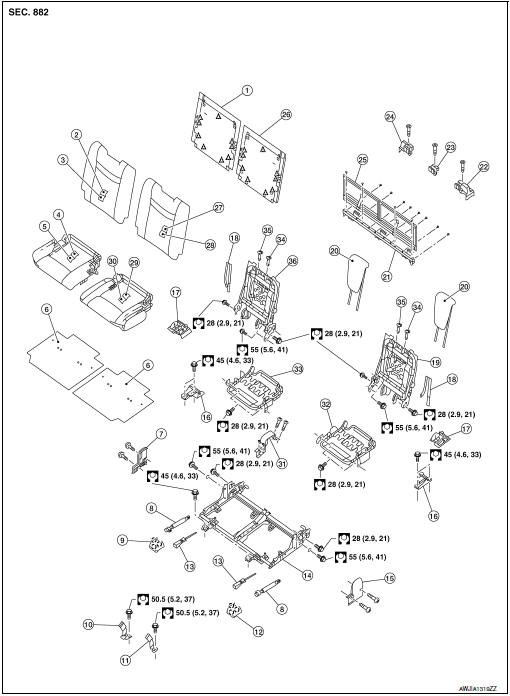
- Seatback board (RH)
- Seatback trim (RH)
- Seatback pad (RH)
- Seat cushion trim (RH)
- Seat cushion pad (RH)
- Seat cushion silencer (LH/RH)
- Seat hinge finisher (RH)
- Gas stay
- Bolt cover (RH)
- Seat belt buckle (RH)
- Seat belt buckle (LH)
- Bolt cover (LH)
- Stopper pin
- Seat frame support
- Seat hinge finisher (LH)
- Seat striker (LH/RH)
- Seat striker finisher (LH/RH)
- Seatback pull strap (LH/RH)
- Seatback frame (LH)
- Headrest (LH/RH)
- Third row seat cross member
- Third row seat cross member finisher (LH)
- Third row seat cross member finisher (center)
- Third row seat cross member finisher (RH)
- Third row luggage floor
- Seatback board (LH)
- Seatback trim (LH)
- Seatback pad (LH)
- Seat cushion trim (LH)
- Seat cushion pad (LH)
- Seat frame finisher (center)
- Seat cushion frame (LH)
- Seat cushion frame (RH))
- Headrest holder (locked)
- Headrest holder (free)
- Seatback frame (RH)
 Clip
Clip
 Pawl
Pawl
Removal and Installation
CAUTION: During removal and installation, an assistant is required to protect against injury or damage.
REMOVAL
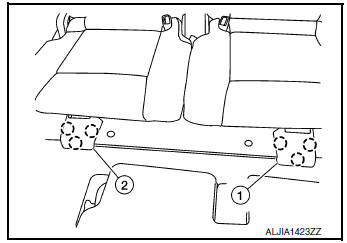
- Using a suitable tool release pawls and remove front bolt covers RH (2) and LH (1).
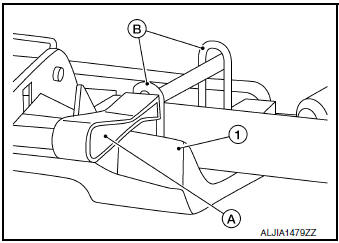
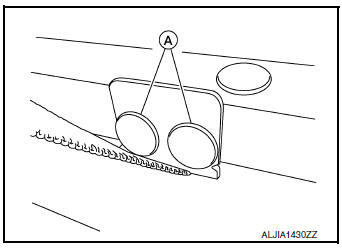
- Insert a suitable tool (A) through both U wires (B) of third row seat legs (1) (LH/RH).
WARNING: Do not remove seat front bolts without inserting a suitable tool through both U wires to protect against personal injury.
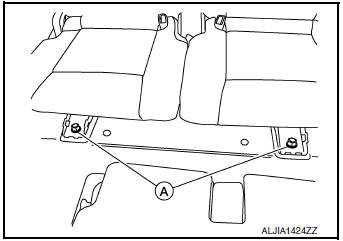
- Remove the seat front bolts (A).
- Fold the seatback to the flat position and open back door.
- Release seat latches by pulling straps (A) rearward, then lift seat from seat strikers (LH/RH) and remove.

INSTALLATION
Installation is in the reverse order of removal.
WARNING: Do not remove suitable tool from U wires before installing seat front bolts or personal injury may occur.
NOTE:
- Two people are required to position the seat so the seat latches are over the seat striker locations.
- Place rear seat legs on strikers, make sure to latch.
- Check that the rear seat latch and striker do not interfere, then tighten bolts to specification. Refer to SE- 42, "Exploded View".
Third Row Seat Cross Member
REMOVAL
- Remove the third row seat. Refer to SE-43, "Removal and Installation".
- Remove screws (A) and third row seat cross member finishers (1, 2, 3).
- Release third row luggage board outer clips (A) and inner clips (B) using a suitable tool.

- Release third row luggage board retainer strap clips (A) (LH/RH) using a suitable tool and remove third row luggage board.
- Remove bolts and remove third row seat cross member.
INSTALLATION
Installation is in the reverse order of removal.
NOTE:
- Tighten the third row seat cross member to specification. Refer to SE-80, "Exploded View".
 Second row seats
Exploded View
RH SEAT
Headrest
Seatback upper luggage
board
Seatback luggage board
Seatback trim
Seatback pad
Recline release cable
Seat cushion trim
Fol ...
 Power seat switch
Exploded View
Seat cushion outer finisher
Power seat switch
Removal and Installation
REMOVAL
NOTE:
LH shown, RH similar.
Using a suitable tool release clips and remove seat ...
Other materials:
U1000 CAN COMM circuit
Description
CAN (Controller Area Network) is a serial communication line for real-time
application. It is an on-vehicle multiplex
communication line with high data communication speed and excellent malfunction
detection ability.
Many electronic control units are equipped onto a vehicle, and ...
Rear suspension ARM
Exploded View
Rear suspension arm
Rubber washer (LH/RH)
Rear suspension arm bracket
Rear suspension arm stay
Front
Removal and Installation
REMOVAL
Remove the wheel hub and bearing. Refer to RAX-16, "Removal and
Installation".
Remove the coil spring. R ...
B1431 seat belt pre-tensioner
DTC Logic
DTC DETECTION LOGIC
CONSULT name
DTC
DTC detecting condition
Repair order
FRONT PRE-TEN RH CIRCUIT
[OPEN]
B1431
RH seat belt pre-tensioner circuit is open.
Refer to SRC-61, "Diagnosis Procedure"
FRONT PRE-TEN RH CIRC ...
