Nissan Rogue Service Manual: Third row seat
Exploded View

- Seatback board (RH)
- Seatback trim (RH)
- Seatback pad (RH)
- Seat cushion trim (RH)
- Seat cushion pad (RH)
- Seat cushion silencer (LH/RH)
- Seat hinge finisher (RH)
- Gas stay
- Bolt cover (RH)
- Seat belt buckle (RH)
- Seat belt buckle (LH)
- Bolt cover (LH)
- Stopper pin
- Seat frame support
- Seat hinge finisher (LH)
- Seat striker (LH/RH)
- Seat striker finisher (LH/RH)
- Seatback pull strap (LH/RH)
- Seatback frame (LH)
- Headrest (LH/RH)
- Third row seat cross member
- Third row seat cross member finisher (LH)
- Third row seat cross member finisher (center)
- Third row seat cross member finisher (RH)
- Third row luggage floor
- Seatback board (LH)
- Seatback trim (LH)
- Seatback pad (LH)
- Seat cushion trim (LH)
- Seat cushion pad (LH)
- Seat frame finisher (center)
- Seat cushion frame (LH)
- Seat cushion frame (RH))
- Headrest holder (locked)
- Headrest holder (free)
- Seatback frame (RH)
 Clip
Clip
 Pawl
Pawl
Seatback
DISASSEMBLY
NOTE: LH shown : RH similar
- Remove third row seat. Refer to SE-43, "Removal and Installation".
- Remove headrest.
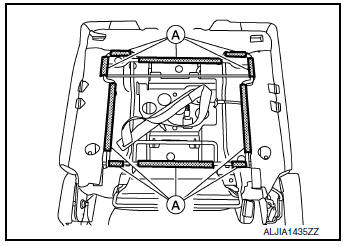
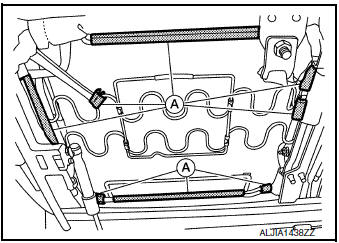
- Remove screws (A) and third row seat cross member finishers (1, 2, 3).

- Release seatback pull strap stop using a suitable tool.
- Release third row luggage board outer clips (A) and inner clips (B) using a suitable tool.
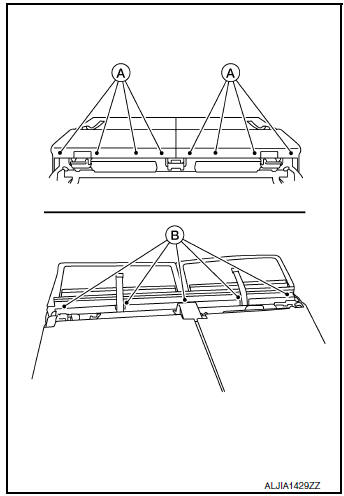
- Release third row luggage board retainer strap clips (A) (LH/RH) using a suitable tool and remove third row luggage board.
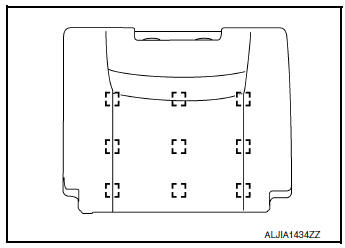
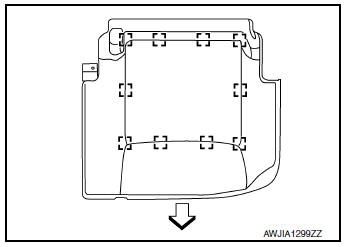
- Release clips using a suitable tool then gently pull seatback
board (1) forward and out and remove as shown (
 ).
).
CAUTION:
After removing the seatback board, check the orientation of
clips. Improper installation of clips could result in damage
to the seatback board.
 : Clip
- Reinstall clips in proper locations on the seatback board.
- Remove screws (A) and remove seat hinge finisher (1).
- Release J-hooks from seat frame and remove seatback trim and seatback pad as an assembly.
- Reach up behind the seatback pad, release the headrest holder
locks as shown and remove the headrest holders.
CAUTION: Before removing/installing headrest holder, check its orientation (front/rear and right/left).
- Release hook and loop finisher and remove hog rings, then separate
seatback trim from seatback pad.
NOTE: Remove all pieces of hog rings and discard them.
 : Hog ring
ASSEMBLY
Assembly is in the reverse order of disassembly.
- Install new hog rings on the seatback trim in original positions.
- Use only one hog ring in each designated location.
- Make sure hog rings are correctly fastened around both the seatback trim and seatback pad wires.
- Use NISSAN standard hog rings and tools to assemble.
- Make sure hook fastener is pressed into place after seatback trim is assembled.
- Smooth out all wrinkles during assembly.
Seat Cushion
DISASSEMBLY
NOTE:
- Remove third row seat. Refer to SE-43, "Removal and Installation".
- Remove third row seat cross member. Refer to SE-44, "Third Row Seat Cross Member".
- Using a suitable tool, release seat cushion trim clips (A) and
remove rear screws (B). Then, release metal clip and remove
the center seat frame finisher (1).
 : Metal clip
 : Front
- Release J-hooks (A) from seat frame and remove seat cushion trim and seat cushion pad.
- Remove hog rings and separate the seat cushion trim from the
seat cushion pad.
NOTE: Remove all pieces of hog rings and discard them.
: Hog ring
 : Front
ASSEMBLY
Assembly is in the reverse order of disassembly.
- Install new hog rings on the seat cushion trim in original positions.
- Use only one hog ring in each designated location.
- Make sure hog rings are correctly fastened around both the seat cushion trim and seat cushion pad wires.
- Use NISSAN standard hog rings and tools to assemble.
- Make sure hook fastener is pressed into place after seat cushion trim is assembled.
- Smooth out all wrinkles during assembly.
 Second row seat
Exploded View
RH SEAT
Headrest
Seatback upper luggage
board
Seatback luggage board
Seatback trim
Seatback pad
Recline release cable
Seat cushion trim
Fold flat strap ...

Other materials:
Additional service when replacing TCM
Description
Always perform the following items when the TCM is replaced.
TCM PROGRAMMING
Since vehicle specifications are not yet written in a new TCM, it
is necessary to write them with CONSULT.
CAUTION:
When replacing TCM, save TCM data on CONSULT before removing TCM.
SAVING ...
SRS air bag warning lamp does not turn off
AIR BAG Warning Lamp Does Not Turn Off
1.CHECK CONDITION OF AIR BAG MODULE
Inspect for any deployed air bag modules or seat belt pre-tensioners.
Are any air bag modules or seat belt pre-tensioners deployed?
YES >> Refer to Frontal collision: SR-5, "FOR FRONTAL COLLISION : When SRS i ...
Preparation
Special Service Tool
The actual shapes of the tools may differ from those illustrated here.
Tool number
(TechMate No.)
Tool name
Description
KV991J0070
(J-45695-A)
Coolant refill tool
Refilling engine cooling system
—
(J-48891)
14 ...
