
Nissan Rogue Service Manual: P0075 intake valve timing control
DTC Description
DTC DETECTION LOGIC
| DTC No. | CONSULT screen terms (Trouble diagnosis content) | DTC detecting condition |
| P0075 | INT/V TIM V/CIR-B1 (Intake valve control solenoid circuit bank 1) |
|
POSSIBLE CAUSE
- Harness or connectors
- Intake valve timing control solenoid valve circuit is open or shorted.
- Intake valve timing intermediate lock control solenoid valve circuit is open or shorted.
- Intake valve timing control solenoid valve
- Intake valve timing intermediate lock control solenoid valve
FAIL-SAFE
Not applicable
DTC CONFIRMATION PROCEDURE
1.PRECONDITIONING
If DTC Confirmation Procedure has been previously conducted, always perform the following procedure before conducting the next test.
- Turn ignition switch OFF and wait at least 10 seconds.
- Turn ignition switch ON.
- Turn ignition switch OFF and wait at least 10 seconds.
>> GO TO 2.
2.PERFORM DTC CONFIRMATION PROCEDURE
- Start engine and let it idle for 5 seconds.
- Check 1st trip DTC.
Is 1st trip DTC detected? YES >> Proceed to EC-191, "Diagnosis Procedure".
NO >> INSPECTION END
Diagnosis Procedure
1.CHECK INTAKE VALVE TIMING (IVT) CONTROL SOLENOID VALVE POWER SUPPLY
- Turn ignition switch OFF.
- Disconnect IVT control solenoid valve harness connector.
- Turn ignition switch ON.
- Check the voltage between intake valve timing control solenoid valve harness connector and ground.

Is the inspection result normal? YES >> GO TO 3.
NO >> GO TO 2.
2.CHECK IVT CONTROL SOLENOID VALVE POWER SUPPLY CIRCUIT
- Turn ignition switch OFF.
- Disconnect IPDM E/R harness connector.
- Check the continuity between IVT control solenoid valve harness connector and IPDM E/R harness connector.

- Also check harness for short to ground.
Is the inspection result normal? YES >> Perform the trouble diagnosis for power supply circuit.
NO >> Repair or replace error-detected parts.
3.CHECK IVT CONTROL SOLENOID VALVE GROUND CIRCUIT
- Turn ignition switch OFF.
- Disconnect ECM harness connector.
- Check the continuity between IVT control solenoid valve harness connector and ECM harness connector.

- Also check harness for short to ground and short to power.
Is the inspection result normal? YES >> GO TO 4.
NO >> Repair or replace error-detected parts.
4.CHECK IVT CONTROL SOLENOID VALVE
Check the IVT control solenoid valve. Refer to EC-193, "Component Inspection (IVT Control Solenoid Valve)".
Is the inspection result normal? YES >> GO TO 5.
NO >> Replace IVT control solenoid valve. Refer to EM-44, "Exploded View".
5.CHECK IVT INTERMEDIATE LOCK CONTROL SOLENOID VALVE POWER SUPPLY
- Disconnect IVT intermediate lock control solenoid valve harness connector.
- Turn ignition switch ON.
- Check the voltage between IVT intermediate lock control solenoid valve harness connector and ground.
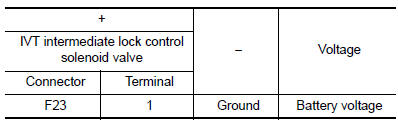
Is the inspection result normal? YES >> GO TO 7.
NO >> GO TO 6.
6.CHECK IVT INTERMEDIATE LOCK CONTROL SOLENOID VALVE POWER SUPPLY CIRCUIT
- Turn ignition switch OFF.
- Disconnect IPDM E/R harness connector.
- Check the continuity between IVT intermediate lock control solenoid valve harness connector and IPDM E/R harness connector.

- Also check harness for short to ground.
Is the inspection result normal? YES >> Perform the trouble diagnosis for power supply circuit.
NO >> Repair or replace error-detected parts.
7.CHECK IVT INTERMEDIATE LOCK CONTROL SOLENOID VALVE GROUND CIRCUIT
- Turn ignition switch OFF.
- Disconnect ECM harness connector.
- Check the continuity between IVT intermediate lock control solenoid valve harness connector and ECM harness connector.

- Also check harness for short to ground and short to power.
Is the inspection result normal? YES >> GO TO 8.
NO >> Repair or replace error-detected parts.
8.CHECK IVT INTERMEDIATE LOCK CONTROL SOLENOID VALVE
Check the IVT intermediate lock control solenoid valve. Refer to EC-194, "Component Inspection (IVT Intermediate Lock Control Solenoid Valve)".
Is the inspection result normal? YES >> GO TO 9.
NO >> Replace IVT intermediate lock control solenoid valve. Refer to EM-64, "Exploded View".
9.CHECK INTERMITTENT INCIDENT
Refer to GI-41, "Intermittent Incident".
>> INSPECTION END
Component Inspection (IVT Control Solenoid Valve)
1.CHECK INTAKE VALVE TIMING CONTROL SOLENOID VALVE-I
- Turn ignition switch OFF.
- Disconnect intake valve timing control solenoid valve harness connector.
- Check resistance between intake valve timing control solenoid valve terminals as follows.

Is the inspection result normal? YES >> GO TO 2.
NO >> Replace intake valve timing control solenoid valve. Refer to EM-44, "Exploded View".
2.CHECK INTAKE VALVE TIMING CONTROL SOLENOID VALVE-II
- Remove intake valve timing control solenoid valve. Refer to EM-44, "Exploded View".
- Provide 12 V DC between intake valve timing control solenoid valve terminals 1 and 2, and then interrupt it. Make sure that the plunger moves as shown in the figure.
CAUTION: Do not apply 12 V DC continuously for 5 seconds or more.
Doing so may result in damage to the coil in intake valve timing control solenoid valve.
NOTE: Always replace O-ring when intake valve timing control solenoid valve is removed.
Is the inspection result normal? YES >> INSPECTION END
NO >> Replace intake valve timing control solenoid valve. Refer to EM-44, "Exploded View".

Component Inspection (IVT Intermediate Lock Control Solenoid Valve)
1.CHECK INTAKE VALVE TIMING INTERMEDIATE LOCK CONTROL SOLENOID VALVE-I
- Turn ignition switch OFF.
- Disconnect intake valve timing intermediate lock control solenoid valve harness connector.
- Check resistance between intake valve timing intermediate lock control solenoid valve terminals as follows.

Is the inspection result normal? YES >> GO TO 2.
NO >> Replace intake valve timing intermediate lock control solenoid valve. Refer to EM-44, "Exploded View".
2.CHECK INTAKE VALVE TIMING INTERMEDIATE LOCK CONTROL SOLENOID VALVE-II
- Remove intake valve timing intermediate lock control solenoid valve. Refer to EM-44, "Exploded View".
- Provide 12 V DC between intake valve timing intermediate lock
control solenoid valve terminals 1 and 2, and then interrupt it.
Make sure that the plunger moves as shown in the figure.
CAUTION: Do not apply 12 V DC continuously for 5 seconds or more.
Doing so may result in damage to the coil in intake valve timing intermediate lock control solenoid valve.
NOTE: Always replace O-ring when intake valve timing intermediate lock control solenoid valve is removed.
Is the inspection result normal?
YES >> INSPECTION END
NO >> Replace intake valve timing intermediate lock control solenoid valve. Refer to EM-44, "Exploded View".

 P0037, P0038 HO2S2 heater
DTC Description
DTC DETECTION LOGIC
DTC No.
CONSULT screen terms
(Trouble diagnosis content)
DTC detecting condition
P0037
HO2S2 HTR (B1)
(HO2S heater control circuit ...
 P0078 EVT control solenoid valve
DTC Description
DTC DETECTION LOGIC
DTC No.
CONSULT screen terms
(Trouble diagnosis content)
DTC detecting condit
P0078
EX V/T ACT/CIRC-B1
(Exhaust valve control solen ...
Other materials:
CAN system (type 6)
MAIN LINE BETWEEN IPDM-E AND DLC CIRCUIT
Diagnosis Procedure
1.CHECK CONNECTOR
Turn the ignition switch OFF.
Disconnect the battery cable from the negative terminal.
Check the following terminals and connectors for damage, bend and
loose connection (connector side
an ...
Controls
Fan control dial
The fan control dial turns the fan on and off, and
controls fan speed.
Air flow control buttons
The air flow control buttons allow you to select
the air flow outlets.
MAX A/C — Air flows mainly from center and
side vents with maximum cooling
and turns on.
— Air flows m ...
Low tire pressure warning lamp stays on
Low Tire Pressure Warning Lamp Stays On When Ignition Switch Is Turned On
1.CHECK BCM CONNECTORS
Turn ignition switch OFF.
Disconnect BCM connectors.
Check terminals for damage or loose connections.
Is the inspection result normal?
YES >> GO TO 2.
NO >> Repair ...
