Nissan Rogue Service Manual: Front bumper
Exploded View
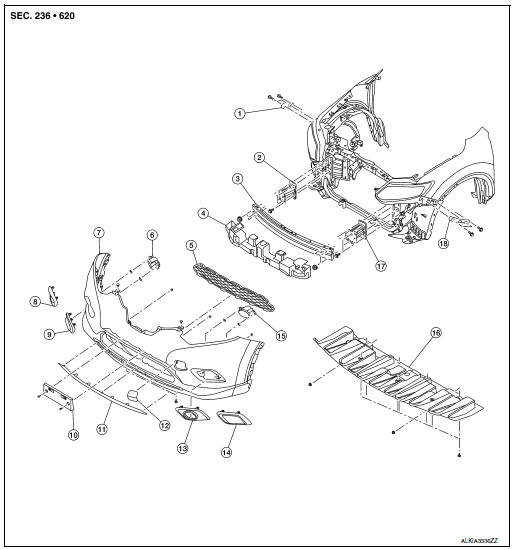
- Front bumper fascia side bracket (RH)
- Front bumper reinforcement support (RH)
- Front bumper reinforcement
- Front energy absorber
- Front lower grille
- Front fog lamp (RH) (if equipped)
- Front bumper fascia
- Front bumper fascia finisher (RH) (if equipped)
- Front fog lamp finisher (RH) (if equipped)
- Front license plate bracket
- Front air spoiler
- Tow cover
- Front fog lamp finisher (LH) (if equipped)
- Front bumper fascia finisher (LH) (if equipped)
- Front fog lamp (LH) (if equipped)
- Front under cover
- Front bumper reinforcement support (LH)
- Front bumper fascia side bracket (LH)
Removal and Installation
REMOVAL
CAUTION: Bumper fascia is made of resin. Use care when handling to prevent damage. Avoid contact with oily substances.
- Remove front grille. Refer to EXT-23, "Removal and Installation".
- Remove front bumper fascia clips (A).

- Remove front bumper fascia clips (A) and screws (B).
- Partially remove front fender protectors (LH/RH). Refer to EXT-28, "FENDER PROTECTOR : Exploded View".
- Partially remove front over fender molding. Refer to EXT-30, "FRONT OVER FENDER : Removal and Installation".
- Remove front bumper fascia screws (A) (LH/RH).
(1): Front bumper fascia
(2): Front over fender molding
- Disconnect fog lamp harness connectors (LH/RH) (if equipped).
- Release front bumper fascia pawls from front bumper fascia side brackets (LH/RH) and remove.
CAUTION: When removing front bumper fascia, two people are required to avoid damaging.
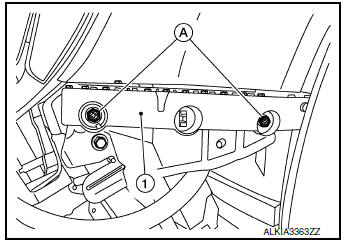
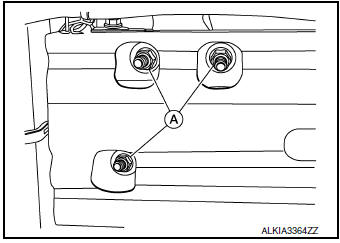
- Remove front bumper fascia bolts (A) and the front bumper side bracket (1) (LH/RH) (if necessary).
- Remove intelligent key warning buzzer. Refer to DLK-273, "Removal and Installation".
- Release harness connector clips from bumper reinforcement, then remove bumper reinforcement nuts (A) and bumper reinforcement (1) (LH/RH).
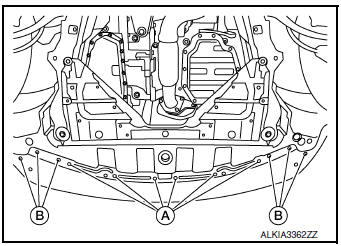
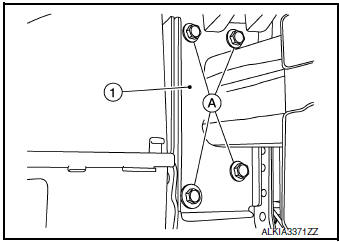
- Remove front bumper reinforcement support bolts (A) and front bumper reinforcement supports (1) (LH/RH).
- Remove the following parts (if necessary) after removing front bumper fascia assembly.
- Front fog lamps (if equipped). Refer to EXL-121, "Removal and Installation".
- Front fog lamp finishers
- Front fascia grille
- Front license plate bracket
INSTALLATION
Installation in the reverse order of removal.
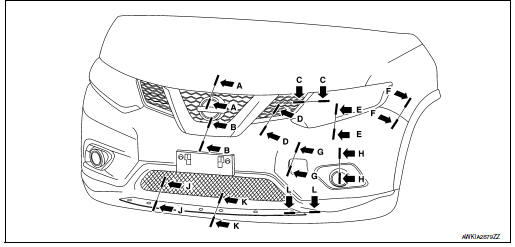
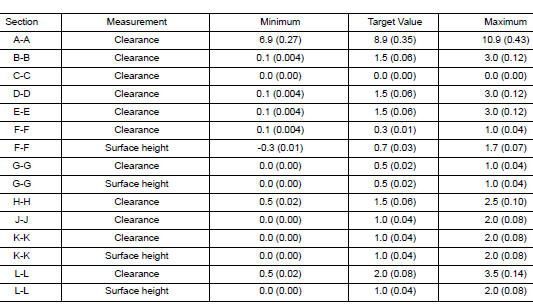
- The following table shows the specified values for checking normal installation status.
- Fitting adjustment cannot be performed.

 Rear bumper
Exploded View
Rear bumper fascia side bracket
(LH)
Rear mud protector
Rear bumper reinforcement support
(LH)
Rear bumper fascia undercover
(LH)
Rear bumper reinforcement
...
Other materials:
Connector Information
HOW TO USE CONNECTOR INFORMATION
Description
Number
Item
Description
1
Connector number
Alphabetic characters show to which harness the connector is
placed.
Numeric characters show the identification number of
connectors.
...
Occupant classification system control unit
Removal and Installation
OCCUPANT CLASSIFICATION SYSTEM CONTROL UNIT
WARNING:
Before servicing the SRS, turn ignition switch OFF, disconnect
both battery terminals then wait at
least three minutes.
Do not use air tools or electric tools for servicing.
Removal
Re ...
Corrosion protection
Description
To provide improved corrosion prevention, the following anti-corrosive
measures have been implemented in
NISSAN production plants. When repairing or replacing body panels, it is
necessary to use the same anti-corrosive
measures.
ANTI-CORROSIVE PRECOATED STEEL (GALVANNEALED STEEL) ...
