
Nissan Rogue Service Manual: Quarter window glass
Exploded View
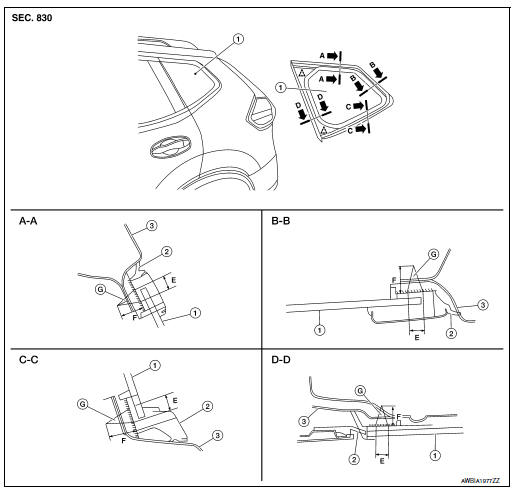
- Quarter window glass
- Quarter window glass molding
- Body side outer
- 7.0 mm (0.28 in)
- 12.0 (0.47 in)
- Adhesive
 Clip
Clip
Removal and Installation
REMOVAL
- Remove the luggage side upper finisher. Refer to INT-36, "LUGGAGE SIDE UPPER FINISHER : Removal and Installation".
- Remove quarter glass from the inside of vehicle using a piano wire or cutting tool and an inflatable bag.
WARNING: When cutting the quarter window from the vehicle, always wear safety glasses and heavy gloves to help prevent glass splinters from entering your eyes or cutting your hands.
CAUTION:
- Apply protective tape around the quarter glass to protect the painted surface.
- Be careful not to scratch the quarter window glass when removing.
- Do not set or stand the quarter window glass on its edge. Small chips may develop into cracks.
INSTALLATION
Installation is in the reverse order of removal.
- Install the quarter glass from outside the vehicle to ensure that it is even around the top, bottom and sides of the opening.
- Use a genuine NISSAN Urethane Adhesive Kit (if available) or equivalent and follow the instructions furnished with it.
- While the urethane adhesive is curing, open a door window. This will prevent the glass from being forced out by passenger compartment air pressure when a door is closed.
- Check gap along bottom to confirm that glass does not contact sheet metal.
- Inform the customer that the vehicle should remain stationary until the urethane adhesive has completely cured (preferably 24 hours). Curing time varies with temperature and humidity.
WARNING:
- Keep heat and open flames away as primers and adhesive are flammable.
- The materials contained in the kit are harmful if swallowed, and may irritate skin and eyes. Avoid contact with the skin and eyes.
- Use in an open, well ventilated location. Avoid breathing the
vapors. They can be harmful if inhaled.
If affected by vapor inhalation, immediately move to an area with fresh air.
- Driving the vehicle before the urethane adhesive has completely cured may affect the performance of the glass in case of an accident.
CAUTION:
- Do not use an adhesive which is past its usable term. Shelf life of this product is limited to six months after the date of manufacture. Carefully adhere to the expiration or manufacture date printed on the box.
- Keep primers and adhesive in a cool, dry place. Ideally, they should be stored in a refrigerator.
- Do not leave primers or adhesive cartridge unattended with their caps open or off.
- The vehicle should not be driven for at least 24 hours or until the urethane adhesive has completely cured. Curing time varies depending on temperature and humidity. The curing time will increase under lower temperatures and lower humidity.
Inspection
REPAIRING WATER LEAKAGE FOR QUARTER WINDOW GLASS
Leakage can be repaired without removing glass.
Determine the extent of leakage if water is leaking between the urethane adhesive material and body or glass.
This can be done by applying water to the side window glass area while pushing glass outward.
Apply primer (if necessary) and then urethane adhesive to the leakage point to stop the leakage.
 Rear power window motor
Removal and Installation
REMOVAL
Remove rear door glass regulator. Refer to GW-22, "Removal and
Installation".
Remove screws (A) and rear door power window motor (1) fr ...
 Back door window glass
Exploded View
Back door window glass
Clip
Clip
Removal and Installation
REMOVAL
Remove back door finisher. Refer to INT-38, "Removal and
Installation".
...
Other materials:
DTC/circuit diagnosis
P1610 LOCK MODE
Description
ECM forcibly switches to the mode that inhibits engine start, when engine
start operation is performed 5 times
or more while communication between ECM and BCM is not normal.
DTC Logic
DTC DETECTION LOGIC
NOTE:
If DTC B1610 is displayed with DTC U1000, fi ...
Rear disc brake
BRAKE PAD
BRAKE PAD : Inspection
INSPECTION
Check brake pad wear thickness from an inspection hole (A) on cylinder
body. Check using a scale if necessary.
Wear thickness : Refer to BR-55, "Rear Disc Brake".
DISC BRAKE ROTOR
DISC BRAKE ROTOR : Inspection
Appearance
Check surfac ...
P0962 pressure control solenoid A
DTC Description
DTC DETECTION LOGIC
DTC
CONSULT screen terms
(Trouble diagnosis content)
DTC detection condition
P0962
PC SOLENOID A
(Pressure Control Solenoid A Control Circuit
Low)
When all of the following conditions are satisfied and this state is
maint ...
