Nissan Rogue Service Manual: On board refueling vapor recovery (ORVR)
Component Function Check
1.CHECK ORVR FUNCTION
Check whether the following symptoms are present.
- Fuel odor from EVAP canister is strong.
- Cannot refuel/Fuel odor from the fuel filler opening is strong while refueling.
Are any symptoms present? YES >> Proceed to EC-477, "Diagnosis Procedure".
NO >> INSPECTION END
Diagnosis Procedure
1.INSPECTION START
Check whether the following symptoms are present.
A: Fuel odor from EVAP canister is strong.
B: Cannot refuel/Fuel odor from the fuel filler opening is strong while refueling.
A or B A >> GO TO 2.
B >> GO TO 7.
2.CHECK EVAP CANISTER
- Remove EVAP canister with EVAP canister vent control valve and EVAP control system pressure sensor attached. Refer to FL-19, "Removal and Installation".
- Weigh the EVAP canister with EVAP canister vent control valve and EVAP control system pressure sensor attached.
The weight should be less than 2.1 kg (4.6 lb).
Is the inspection result normal? YES >> GO TO 3.
NO >> GO TO 4.
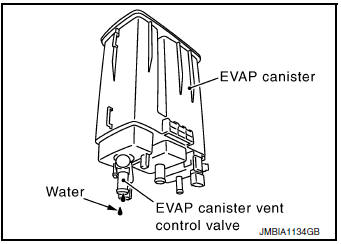
3.CHECK IF EVAP CANISTER IS SATURATED WITH WATER
Check if water will drain from EVAP canister Does water drain from the EVAP canister? YES >> GO TO 4.
NO >> GO TO 6.
4.REPLACE EVAP CANISTER
Replace EVAP canister with a new one. Refer to FL-19, "Removal and Installation".
>> GO TO 5.
5.DETECT MALFUNCTIONING PART
Check the EVAP hose between EVAP canister and vehicle frame for clogging or poor connection.
>> Repair or replace EVAP hose. Refer to FL-12, "FWD : Removal and Installation" (with FWD models) or FL-16, "AWD : Removal and Installation" (with AWD models).
6.CHECK REFUELING EVAP VAPOR CUT VALVE
Check refueling EVAP vapor cut valve. Refer to EC-479, "Component Inspection".
Is the inspection result normal? YES >> INSPECTION END
NO >> Replace refueling EVAP vapor cut valve with fuel tank. Refer to FL-12, "FWD : Removal and Installation" (with FWD models) or FL-16, "AWD : Removal and Installation" (with AWD models).
7.CHECK EVAP CANISTER
- Remove EVAP canister with EVAP canister vent control valve and EVAP control system pressure sensor attached. Refer to FL-19, "Removal and Installation".
- Weigh the EVAP canister with EVAP canister vent control valve and EVAP control system pressure sensor attached.
The weight should be less than 2.1 kg (4.6 lb).
Is the inspection result normal? YES >> GO TO 8.
NO >> GO TO 9.
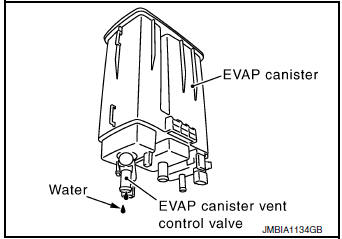
8.CHECK IF EVAP CANISTER IS SATURATED WITH WATER
Check if water will drain from EVAP canister.
Does water drain from the EVAP canister? YES >> GO TO 6.
NO >> GO TO 11.
9.REPLACE EVAP CANISTER
Replace EVAP canister with a new one. Refer to FL-19, "Removal and Installation".
>> GO TO 10.
10.DETECT MALFUNCTIONING PART
Check the EVAP hose between EVAP canister and vehicle frame for clogging or poor connection.
>> Repair or replace EVAP hose. Refer to FL-12, "FWD : Removal and Installation" (with FWD models) or FL-16, "AWD : Removal and Installation" (with AWD models).
11.CHECK VENT HOSES AND VENT TUBES
Check hoses and tubes between EVAP canister and refueling control valve for clogging, kinks, looseness and improper connection.
Is the inspection result normal? YES >> GO TO 12.
NO >> Repair or replace hoses and tubes.
12.CHECK FILLER NECK TUBE
Check recirculation line for clogging, dents and cracks.
Is the inspection result normal? YES >> GO TO 13.
NO >> Replace filler neck tube.
13.CHECK REFUELING EVAP VAPOR CUT VALVE
Check refueling EVAP vapor cut valve. Refer to EC-479, "Component Inspection".
Is the inspection result normal? YES >> GO TO 14.
NO >> Replace refueling EVAP vapor cut valve with fuel tank. Refer to FL-12, "FWD : Removal and Installation" (with FWD models) FL-16, "AWD : Removal and Installation" (with AWD models).
14.CHECK FUEL FILLER TUBE
Check filler neck tube and hose connected to the fuel tank for clogging, dents and cracks.
Is the inspection result normal? YES >> GO TO 15.
NO >> Replace fuel filler tube. Refer to FL-12, "FWD : Exploded View" (with FWD models) FL-16, "AWD : Exploded View" (with AWD models).
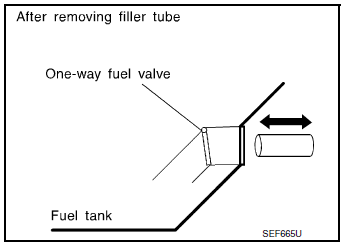
15.CHECK ONE-WAY FUEL VALVE-1
Check one-way valve for clogging.
Is the inspection result normal? YES >> GO TO 16.
NO >> Repair or replace one-way fuel valve with fuel tank. Refer to FL-12, "FWD : Removal and Installation" (with FWD models) FL-16, "AWD : Removal and Installation" (with AWD models).
16.CHECK ONE-WAY FUEL VALVE-2
- Check that fuel is drained from the tank.
- Remove fuel filler tube and hose. Refer to FL-12, "FWD : Exploded View" (with FWD models) FL-16, "AWD : Exploded View" (with AWD models).
- Check one-way fuel valve for operation as per the following.
When a stick is inserted, the valve should open, when removing stick it should close.
Do not drop any material into the tank.
Is the inspection result normal? YES >> INSPECTION END
NO >> Replace fuel filler tube or replace one-way fuel valve with fuel tank. Refer to FL-12, "FWD : Removal and Installation" (with FWD models) FL-16, "AWD : Removal and Installation" (with AWD models).
Component Inspection
1.INSPECTION START
Will CONSULT be used? Will CONSULT be used? YES >> GO TO 2.
NO >> GO TO 3.
2.CHECK REFUELING EVAP VAPOR CUT VALVE
 With CONSULT
- Turn ignition switch OFF.
- Remove fuel tank. Refer to FL-12, "FWD : Removal and Installation" (with FWD models) FL-16, "AWD : Removal and Installation" (with AWD models).
- Drain fuel from the tank as per the following:
- Remove fuel feed hose located on the fuel gauge retainer.
- Connect a spare fuel hose, one side to fuel gauge retainer where the hose was removed and the other side to a fuel container.
- Drain fuel using ŌĆ£FUEL PUMP RELAYŌĆØ in ŌĆ£ACTIVE TESTŌĆØ mode with CONSULT.
- Check refueling EVAP vapor cut valve for being stuck to close as
per the following.
Blow air into the refueling EVAP vapor cut valve (from the end of EVAP/ORVR line hose), and check that the air flows freely into the tank.
- Check refueling EVAP vapor cut valve for being stuck to open as per the following.
- Connect vacuum pump to hose end.
- Remove fuel gauge retainer with fuel gauge unit.
Always replace O-ring with new one.
- Turn fuel tank upside down.
- Apply vacuum pressure to hose end [−13.3 kPa (−0.136 kg/cm2, −1.93 psi)] with fuel gauge retainer remaining open and check that the pressure is applicable.
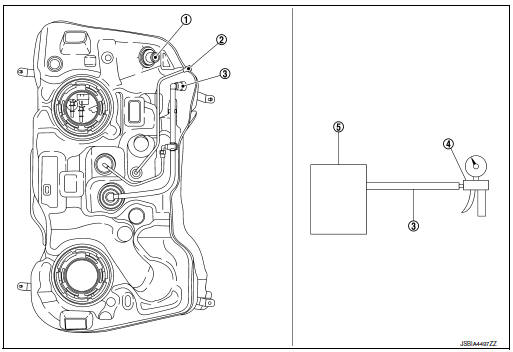
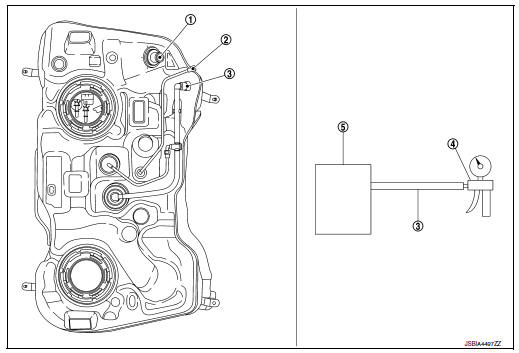
1 Filler tube
2 Recirculation line
3 EVAP/ORVR line
4 Vacuum/pressure handy pump
5 Fuel tank
Is the inspection result normal? YES >> INSPECTION END
NO >> Replace refueling EVAP vapor cut valve with fuel tank. Refer to FL-12, "FWD : Removal and Installation" (with FWD models) FL-16, "AWD : Removal and Installation" (with AWD models).
3.CHECK REFUELING EVAP VAPOR CUT VALVE
Without CONSULT
- Turn ignition switch OFF.
- Remove fuel tank. Refer to FL-12, "FWD : Removal and Installation" (with FWD models) FL-16, "AWD : Removal and Installation" (with AWD models).
- Drain fuel from the tank as per the following:
- Remove fuel gauge retainer.
- Drain fuel from the tank using a handy pump into a fuel container.
- Check refueling EVAP vapor cut valve for being stuck to close as
per the following.
Blow air into the refueling EVAP vapor cut valve (from the end of EVAP/ORVR line hose), and check that the air flows freely into the tank.
- Check refueling EVAP vapor cut valve for being stuck to open as per the following.
- Connect vacuum pump to hose end.
- Remove fuel gauge retainer with fuel gauge unit.
Always replace O-ring with new one.
- Turn fuel tank upside down.
- Apply vacuum pressure to hose end [−13.3 kPa (−0.136 kg/cm2, −1.93 psi)] with fuel gauge retainer remaining open and check that the pressure is applicable.
1 Filler tube
2 Recirculation line
3 EVAP/ORVR line
4 Vacuum/pressure handy pump
5 Fuel tank
Is the inspection result normal? YES >> INSPECTION END
NO >> Replace refueling EVAP vapor cut valve with fuel tank. Refer to FL-12, "FWD : Removal and Installation" (with FWD models) FL-16, "AWD : Removal and Installation" (with AWD models).
 Malfunction indicator lamp
Component Function Check
1.CHECK MIL FUNCTION
Turn ignition switch ON.
Check that MIL illuminates.
Is the inspection result normal?
YES >> INSPECTION END
NO >> Proc ...
 Refrigerant pressure sensor
Component Function Check
1.CHECK REFRIGERANT PRESSURE SENSOR FUNCTION
Start engine and warm it up to normal operating temperature.
Turn A/C switch and blower fan switch ON.
...
Other materials:
Avoiding collision and rollover
WARNINGFailure to operate this vehicle in a safe
and prudent manner may result in loss of
control or an accident.
Be alert and drive defensively at all times. Obey
all traffic regulations. Avoid excessive speed,
high speed cornering, or sudden steering maneuvers,
because these ...
How to follow trouble diagnoses
Description
NOTICE:
Trouble diagnoses indicate work procedures required to diagnose problems
effectively. Observe the following
instructions before diagnosing.
Before performing trouble diagnoses, read the ŌĆ£Work FlowŌĆØ in each
section.
After repairs, re-check that the pr ...
Removal and installation
AV CONTROL UNIT
Exploded View
AV control unit bracket (LH)
AV control unit
AV control unit bracket (RH)
Removal and Installation
REMOVAL
CAUTION:
Before disconnecting the AV control unit and battery terminals,
turn the ignition switch OFF and wait
at least 30 secon ...
