
Nissan Rogue Service Manual: Oil filter
Removal and Installation
REMOVAL
- Remove fender protector side cover (RH). Refer to EXT-28, "FENDER PROTECTOR : Exploded View".
- Drain engine oil. Refer to LU-8, "Draining".
- Remove oil filter using suitable tool (A)..
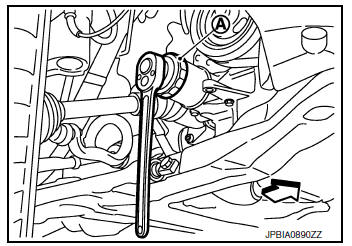
 : Front
WARNING: Be careful not to burn yourself, as engine oil may be hot.
CAUTION:
- When removing, prepare a shop cloth to absorb any engine oil leaks or spills.
- Do allow engine oil to adhere to drive belt.
- Completely wipe off any engine oil that adheres to engine and vehicle.
- Oil filter is provided with relief valve. Use genuine NISSAN oil filter or equivalent.

INSTALLATION
- Remove foreign materials adhering to oil filter installation surface.
- Apply new engine oil to the oil seal contact surface of new oil filter.

- Screw oil filter manually until it touches the installation surface, then tighten it by 2/3 turn (A). Or tighten to the specification.

Oil filter:
 : 17.7 N·m (1.8 kg-m, 13 ft-lb)
Inspection
INSPECTION AFTER INSTALLATION
- Check the engine oil level. Refer to LU-7, "Inspection".
- Start the engine, and check that there is are no leaks of engine oil.
- Stop the engine and wait for at least 5 minutes.
- Check the engine oil level, and adjust the level (if necessary). Refer to LU-7, "Inspection".
 Engine oil
Inspection
ENGINE OIL LEVEL
NOTE:
Before starting engine, put vehicle horizontally and check the engine oil level.
If engine is already started, stop
it and allow 5 minutes before checking.
...

Other materials:
Diagnosis system (BCM) (with intelligent key system)
COMMON ITEM
COMMON ITEM : CONSULT Function (BCM - COMMON ITEM)
APPLICATION ITEM
CONSULT performs the following functions via CAN communication with BCM.
Direct Diagnostic Mode
Description
Ecu Identification
The BCM part number is displayed.
Self Diagnostic ...
Precautions on child restraints
WARNING
Failure to follow the warnings and instructions
for proper use and installation
of child restraints could result in
serious injury or death of a child or
other passengers in a sudden stop or
collision:
The child restraint must be ...
Driving safety precautions
Your NISSAN is designed for both normal and
off-road use. However, avoid driving in deep water
or mud as your NISSAN is mainly designed for
leisure use, unlike a conventional off-road vehicle.
Remember that two-wheel drive models are less
capable than all-wheel drive models for rough
road dr ...
