Nissan Rogue Service Manual: Front seat belt
Exploded View

- Seat belt height adjuster (RH)
- Seat belt height adjuster bolt cover (RH)
- Seat belt retractor (RH)
- Seat belt buckle (RH)
- Seat belt buckle (LH)
- Seat belt retractor (LH)
- Seat belt height adjuster bolt cover (LH)
- Seat belt height adjuster (LH)
SEAT BELT RETRACTOR
SEAT BELT RETRACTOR : Removal and Installation
REMOVAL
WARNING:
- Before servicing the SRS, turn the ignition switch off, disconnect both battery terminals then wait at least three minutes.
- Do not drop the seat belt retractor. Always handle it with care.
- Always point pre-tensioner cylinder away from body when handling.
- Remove front seat. Refer to SE-32, "DRIVER SIDE : Removal and Installation" (Driver side) or SE-35, "PASSENGER SIDE : Removal and Installation" (Passenger side).
- Remove the center pillar lower finisher. Refer to INT-22, "CENTER PILLAR LOWER FINISHER : Removal and Installation".
- Release pawls, using a suitable tool (A) and remove the shoulder anchor cover.
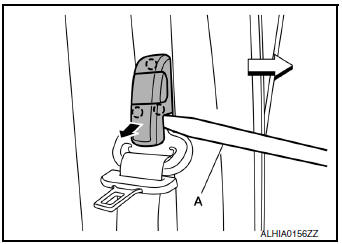
 : Pawl
 : Front
- Remove the D-ring anchor bolt.
- Disconnect the harness connector (A) from the seat belt pre-tensioner (1).
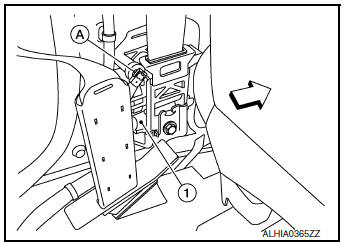
: Front
CAUTION:
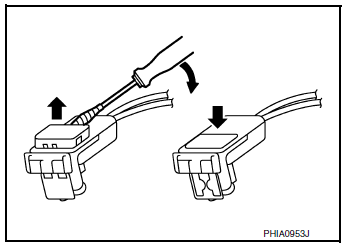
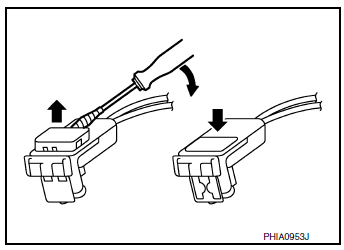
- For removing/installing the shoulder belt pre-tensioner harness connector, insert a thin screwdriver wrapped in tape into the notch, then lift the lock and remove the harness connector as shown.
- Install the harness connector with the lock raised, and push the lock into the harness connector as shown.
- After installing the harness connector, check that the lock is pushed in securely.
- Disconnect the harness connector (A) from the lap belt pre-tensioner (1).
: Front
CAUTION:
- For removing/installing the lap belt pre-tensioner harness connector, insert a thin screwdriver wrapped in tape into the notch, then lift the lock and remove the harness connector as shown.
- Install the harness connector with the lock raised, and push the lock into the harness connector as shown.
- After installing the harness connector, check that the lock is pushed in securely.
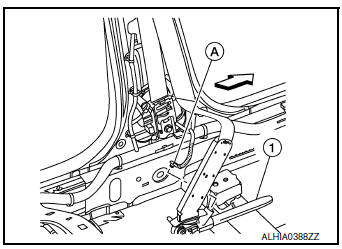
- Remove seat belt retractor bolt and lap belt pre-tensioner bolt and remove seat belt retractor.
INSTALLATION
Installation is in the reverse order of removal.
CAUTION:
- Tighten the D-ring Anchor bolt and seat belt retractor bolts to specification. Refer to SB-8, "Exploded View".
- Tighten the lap belt pre-tensioner bolts to specification. Refer to SB-8, "Exploded View".
- Make sure that the seat belt height adjuster is locked in the lowest position and is aligned with the center pillar upper finisher opening during installation.
- Make sure both the D-ring anchor and seat belt height adjuster operate freely.
- Always perform an inspection after repair to make sure the
system is functioning within specifications.
Refer to SB-5, "Inspection".
SEAT BELT HEIGHT ADJUSTER
SEAT BELT HEIGHT ADJUSTER : Removal and Installation
REMOVAL
- Remove center pillar upper finisher. Refer to INT-21, "CENTER PILLAR UPPER FINISHER : Removal and Installation".
- Remove the seat belt height adjuster bolts (A) and seat belt height adjuster (1).
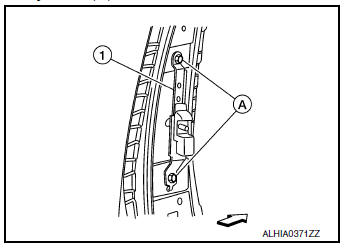
 : Front
INSTALLATION
Installation is in the reverse order of removal.
CAUTION:
- Make sure that the seat belt height adjuster is locked in the lowest position and is aligned with the center pillar upper finisher opening during installation.
- Tighten the D-ring anchor bolt and seat belt height adjuster bolts to specification. Refer to SB-8, "Exploded View".
- Make sure both the D-ring anchor and seat belt height adjuster operate freely.
- Always perform an inspection after repair to make sure the
system is functioning within specifications.
Refer to SB-5, "Inspection".
FRONT SEAT BELT BUCKLE
FRONT SEAT BELT BUCKLE : Removal and Installation
REMOVAL
- Remove front seat. Refer to SE-32, "DRIVER SIDE : Removal and Installation" (Driver side) or SE-35, "PASSENGER SIDE : Removal and Installation" (Passenger side).
- Disconnect seat belt buckle harness connector.
- Remove seat belt buckle anchor bolt and seat belt buckle.
INSTALLATION
Installation is in the reverse order of removal.
CAUTION:
- Tighten the seat belt buckle anchor bolt to specification. Refer to SB-8, "Exploded View".
- Always perform an inspection after repair to make sure the
system is functioning within specifications.
Refer to SB-5, "Inspection".

 Second row seat belt
Exploded View
Seat belt retractor (center)
Seat belt D-ring bracket (LH/
RH)
Seat belt hook (LH/RH)
Seat belt retractor (RH)
Seat belt D-ring bolt cover
(LH/RH)
Seat belt buckl ...
Other materials:
Service data and specifications (SDS)
General specifications
Brake pedal
Brake booster
Front Disc Brake
Rear disc brake
...
Normal operating condition
Description
FUEL CUT CONTROL (AT NO LOAD AND HIGH ENGINE SPEED)
If the engine speed is above 1,800 rpm under no load (for example, the
selector lever position is neutral and
engine speed is over 1,800 rpm) fuel will be cut off after some time. The exact
time when the fuel is cut off varies
b ...
Preparation
Commercial Service Tool
Tool name
Description
Ball joint remover
Removing wheel stud
Power tools
Loosening nuts, screws, and bolts
...
