
Nissan Rogue Service Manual: Front disc brake
BRAKE CALIPER ASSEMBLY (1 PISTON TYPE)
BRAKE CALIPER ASSEMBLY (1 PISTON TYPE) : Exploded View
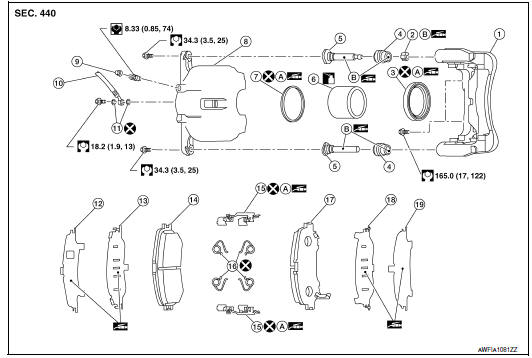
- Torque member
- Bushing
- Piston boot
- Slide pin boot
- Slide pin
- Piston
- Piston seal
- Brake caliper body
- Bleeder cap
- Brake hose
- Copper sealing washers
- Inner shim cover
- Inner shim
- Inner pad
- Pad retainer
- Anti-rattle clip
- Outer pad
- Outer shim
- Outer shim cover
- Molykote AS-880N
- Niglube Rx-2
 : Apply brake fluid.
BRAKE CALIPER ASSEMBLY (1 PISTON TYPE) : Disassembly and Assembly
DISASSEMBLY
- Remove the brake caliper from the vehicle. Refer to BR-35, "BRAKE CALIPER ASSEMBLY (1 PISTON TYPE) : Removal and Installation".
- Remove sliding pins and sliding pin boots from torque member.
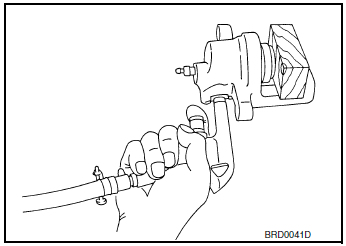
- Place a wooden block in brake caliper body and blow air from
union bolt hole to remove piston and piston boots.
WARNING: Do not get fingers caught between piston and brake caliper body.
CAUTION: Do not reuse piston boots.
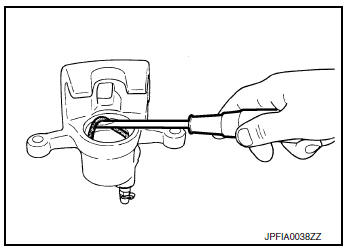
- Remove piston seals from brake caliper body using suitable tool.
CAUTION:
- Do not damage cylinder inner wall.
- Do not reuse piston seals.
- Remove bleeder valve and cap.
INSPECTION AFTER DISASSEMBLY
Brake Caliper Body
Check the inner wall of the brake caliper body for rust, wear, cracks or damage. Replace the brake caliper body if any abnormal condition is detected.
CAUTION: Always clean with new brake fluid. Do not clean with mineral oil such as gasoline and light oil.
Torque Member
Check the torque member for rust, wear, cracks or damage. Replace the torque member if any abnormal condition is detected.
Piston Check the surface of the piston for rust, wear, cracks or damage. Replace the piston if any abnormal condition is detected.
CAUTION: Piston sliding surface is plated. Do not polish with sandpaper.
Sliding Pin and Sliding Pin Boot
Check the sliding pins and sliding pin boots for rust, wear, cracks or damage. Replace the parts if any abnormal condition is detected.
ASSEMBLY
- Install bleeder valve and cap.
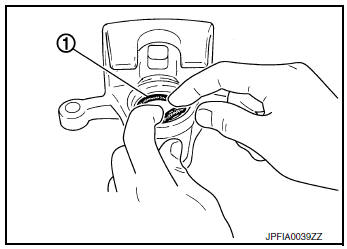
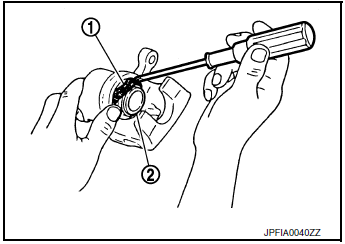
- Apply rubber grease to each piston seal (1), and install them to the brake caliper body.
CAUTION: Do not reuse piston seal.
- Apply rubber grease to the piston boots. Cover each piston end
with a piston boot, and then install cylinder side lip on piston
boot securely into a groove on brake caliper body.
CAUTION: Do not reuse piston boots.
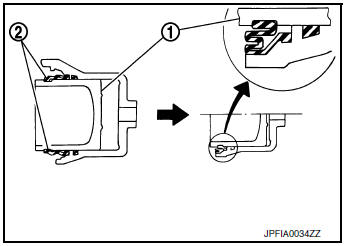
- Apply brake fluid to each piston (1). Push each piston into cylinder
body by hand and push piston boot (2) piston-side lip into
the piston groove.
CAUTION: Press the piston evenly and vary the pressing point to prevent cylinder inner wall from being rubbed.
- Apply rubber grease to bushing; install bushing to sliding pin.
- Apply rubber grease to sliding pins and sliding pin boots, install sliding pins and sliding pin boots to torque member.
- Install the brake caliper to the vehicle. Refer to BR-35, "BRAKE CALIPER ASSEMBLY (1 PISTON TYPE) : Removal and Installation".
INSPECTION AFTER INSTALLATION
- Check the drag of front disc brake. If any drag is found, follow the procedure described below.
- Remove brake pads.
- Using a suitable tool, press the piston into the brake caliper
body.
CAUTION: Do not damage the piston boots.
- Install brake pads.
- Depress the brake pedal several times.
- Check the drag of front disc brake again. If any drag is found, disassemble the brake caliper body.
- Burnish contact surfaces after refinishing or replacing disc
rotors or if a soft pedal occurs at very low mileage.
Refer to BR-18, "Brake Burnishing".
BRAKE CALIPER ASSEMBLY (2 PISTON TYPE)
BRAKE CALIPER ASSEMBLY (2 PISTON TYPE) : Exploded View
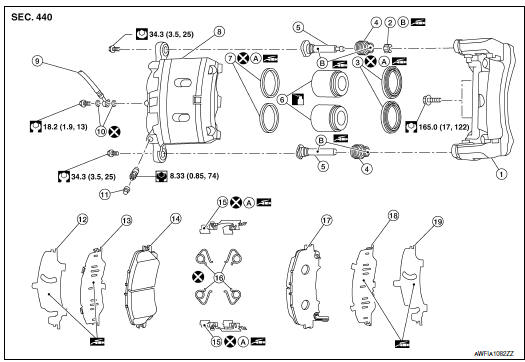
- Torque member
- Bushing
- Piston boot
- Slide pin boot
- Slide pin
- Piston
- Piston seal
- Brake caliper body
- Bleeder cap
- Brake hose
- Copper sealing washers
- Inner shim cover
- Inner shim
- Inner pad
- Pad retainer
- Anti-rattle clip
- Outer pad
- Outer shim
- Outer shim cover
- Molykote AS-880N
- Niglube Rx-2
 : Apply brake fluid.
BRAKE CALIPER ASSEMBLY (2 PISTON TYPE) : Disassembly and Assembly
DISASSEMBLY
- Remove the brake caliper from the vehicle. Refer to BR-39, "BRAKE CALIPER ASSEMBLY (2 PISTON TYPE) : Removal and Installation".
- Remove sliding pins and sliding pin boots from torque member.
- Place a wooden block in brake caliper body and blow air from
union bolt hole to remove pistons and piston boots.
WARNING: Do not get fingers caught between pistons and brake caliper body.
CAUTION: Do not reuse piston boots.
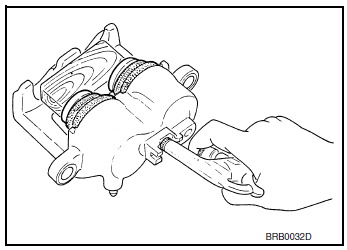
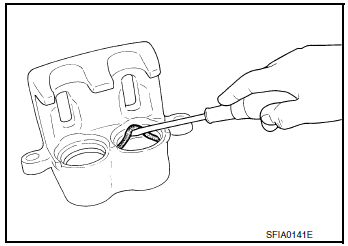
- Remove piston seals from brake caliper body using suitable tool.
CAUTION:
- Do not damage cylinder inner wall.
- Do not reuse piston seals.
- Remove bleeder valve and cap.
INSPECTION AFTER DISASSEMBLY
Brake Caliper Body
Check the inner wall of the brake caliper body for rust, wear, cracks or damage. Replace the brake caliper body if any abnormal condition is detected.
CAUTION: Always clean with new brake fluid. Do not clean with mineral oil such as gasoline and light oil.
Torque Member
Check the torque member for rust, wear, cracks or damage. Replace the torque member if any abnormal condition is detected.
Piston
Check the surface of the piston for rust, wear, cracks or damage. Replace the piston if any abnormal condition is detected.
CAUTION: Piston sliding surface is plated. Do not polish with sandpaper.
Sliding Pin and Sliding Pin Boot
Check the sliding pins and sliding pin boots for rust, wear, cracks or damage. Replace the parts if any abnormal condition is detected.
ASSEMBLY
- Install bleeder valve and cap.
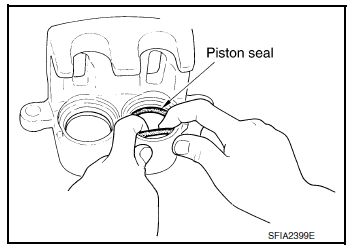
- Apply rubber grease to each piston seal (1), and install them to
the brake caliper body.
CAUTION: Do not reuse piston seal.
- Apply rubber grease to the piston boots. Cover each piston end
with a piston boot, and then install cylinder side lip on piston
boot securely into a groove on brake caliper body.
CAUTION: Do not reuse piston boots.

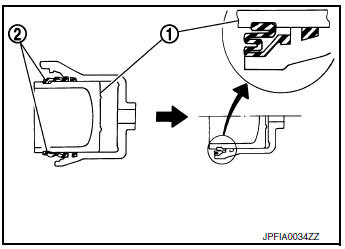
- Apply brake fluid to each piston (1). Push each piston into cylinder
body by hand and push piston boot (2) piston-side lip into
the piston groove.
CAUTION: Press the piston evenly and vary the pressing point to prevent cylinder inner wall from being rubbed.
- Apply rubber grease to bushing; install bushing to sliding pin.
- Apply rubber grease to sliding pins and sliding pin boots, install sliding pins and sliding pin boots to torque member.
- Install the brake caliper to the vehicle. Refer to BR-39, "BRAKE CALIPER ASSEMBLY (2 PISTON TYPE) : Removal and Installation".
INSPECTION AFTER INSTALLATION
- Check the drag of front disc brake. If any drag is found, follow the procedure described below.
- Remove brake pads.
- Using a suitable tool, press the pistons into the brake caliper
body.
CAUTION: Do not damage the piston boots.
- Install brake pads.
- Depress the brake pedal several times
- Check the drag of front disc brake again. If any drag is found, disassemble the brake caliper body.
- Burnish contact surfaces after refinishing or replacing disc
rotors or if a soft pedal occurs at very low mileage.
Refer to BR-18, "Brake Burnishing".

 Rear disc brake
Exploded View
Sliding pin bolt
Sliding pin bolt bushing
Cap
Bleeder valve
Brake caliper body
Piston seal
Piston
Piston boot
Sliding pin boot
&nb ...
Other materials:
Unit removal and installation
TRANSAXLE ASSEMBLY
Exploded View
Transaxle assembly
O-ring
CVT fluid charging pipe
CVT fluid charging pipe cap
For the tightening torque, refer to TM-220, "Removal and
Installation".
Always replace after every
disassembly.
: N·m (kg-m, ft-lb)
: N·m ...
On board diagnostic (OBD) system
Diagnosis Description
This system is an on board diagnostic system that records exhaust
emission-related diagnostic information
and detects a sensors/actuator-related malfunction. A malfunction is indicated
by the malfunction indicator
lamp (MIL) and stored in ECU memory as a DTC. The diagnos ...
Ducts and grilles
Exploded View
Side defroster duct (RH)
Defroster nozzle
Side defroster duct (LH)
Center ventilator duct
Heating and cooling unit assembly
Front foot duct (LH)
Front floor connecting duct (LH)
Front floor duct (LH)
Rear center ventilator duct
Adaptor duct 11 ...
