
Nissan Rogue Service Manual: Door mirror
Exploded View
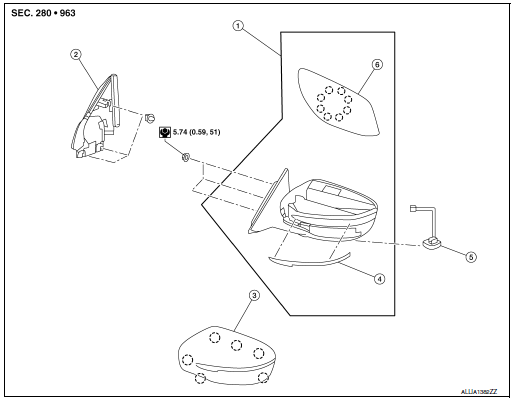
- Door mirror
- Door mirror corner finisher
- Door mirror rear finisher
- Side turn signal lamp
- Side camera (if equipped)
- Door mirror glass
 Pawl
Removal and Installation
REMOVAL
- Remove front door finisher. Refer to INT-15, "Removal and Installation".
- Release door mirror corner finisher clips using a suitable tool.
- Disconnect the harness connector from the blind spot warning indicator (if equipped), then remove the door mirror corner finisher.
- Disconnect the harness connector from the door mirror.
- Remove door mirror nuts and door mirror.
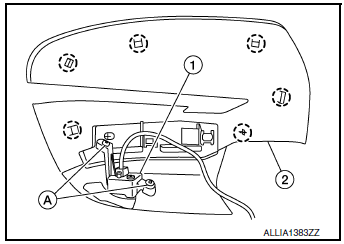
- Remove screws (A) and side camera (1) (if equipped) (if necessary)
from door mirror rear finisher (2). : Pawl
INSTALLATION
Installation is in the reverse order of removal.
CAUTION: Perform camera image calibration (if equipped with around view camera). Refer to AV-136, "CALIBRATING CAMERA IMAGE (AROUND VIEW MONITOR) : Work Procedure".
 Inside mirror
Exploded View
MANUAL ANTI-DAZZLING
Windshield glass
Mirror base
Inside mirror
AUTO ANTI-DAZZLING
Windshield glass
Mirror base
Inside mirror
Inside mirror finish ...
 Door mirror glass
Removal and Installation
REMOVAL
Release the metal clips and pawls that retain the door mirror
glass using a suitable tool, disconnect the harness connectors
(A) (if equipped) from the ...
Other materials:
Information display (ASCD)
Component Function Check
1.CHECK INFORMATION DISPLAY
Start engine.
Press ASCD MAIN switch on ASCD steering switch.
Drive the vehicle at more than 40 km/h (25 MPH).
CAUTION:
Always drive vehicle at a safe speed.
Press SET/− switch.
Check that the r ...
Precautions on SRS
This SRS section contains important information
concerning the following systems:
Driver and passenger supplemental frontimpact
air bag (NISSAN Advanced Air Bag
System)
Front seat-mounted side-impact supplemental
air bag
Roof-mounted curtain side-impact and rollover
supp ...
Engine stand setting
NOTE:
Explained here is how to disassemble with engine stand supporting transaxle
surface. When using a different
type of engine stand, note difference in steps, etc.
Remove engine and transaxle assembly from vehicle, and separate
transaxle from engine. Refer to EM-
81, "Expl ...
