
Nissan Rogue Owners Manual: Changing engine oil filter
 >
Changing engine oil filter
>
Changing engine oil filter
- Park the vehicle on a level surface and apply the parking brake.
- Turn the engine off.
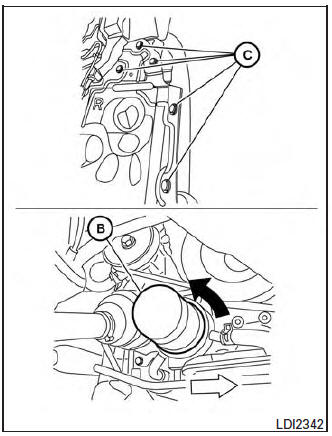
- Place a large drain pan under the oil filter B .
- Remove pins C from the right engine protector
located inside right wheel well, remove
protector. Remove oil filter B with an
oil filter wrench by turning it counterclockwise.
Then remove the oil filter by turning it by hand.
| CAUTION Be careful not to burn yourself. The engine oil may be hot. |
- Wipe the engine oil filter sealing surface with a clean rag.
CAUTION
|
- Coat the gasket on the new filter with clean engine oil.
- Screw on the oil filter until a slight resistance is felt, then tighten an additional 2/3 turn.
- Start the engine and check for leakage around the oil filter. Correct as required.
- Turn the engine off and wait more than 10 minutes. Check the oil level. Add engine oil if necessary.
 Changing engine oil
Changing engine oil
Park the vehicle on a level surface and apply
the parking brake.
Start the engine and let it idle until it reaches
operating temperature, then turn it off.
& ...
 Continuously Variable Transmission (CVT) fluid
CAUTION
NISSAN recommends using Genuine
NISSAN CVT Fluid NS-3 ONLY in
NISSAN CVTs. Do not mix with other
fluids.
Do not use Automatic transmission
fluid (ATF ...
Other materials:
Fuel injector
Component Function Check
1.INSPECTION START
Turn ignition switch to START.
Are any cylinders ignited?
YES >> GO TO 2.
NO >> Proceed to EC-464, "Diagnosis Procedure".
2.CHECK FUEL INJECTOR FUNCTION
With CONSULT
Start engine.
Perform “POWER BALANCE ...
DTC/circuit diagnosis
B2600-46 CONFIG ERROR
DTC Description
DTC DETECTION LOGIC
DTC
Trouble diagnosis
(Trouble diagnosis contents)
Detecting condition
B2600-46
CONFIG ERROR
(Configuration error)
When errors are detected in the configuration data stored in the BCM
(CAN
...
Adjusting the screen
The procedure for adjusting the quality of the
screen differs depending on the type of screen
present on the vehicle.
For vehicles without Navigation System:
Press the ENTER/SETTING or
ENTER/AUDIO button.
Turn the TUNE/SCROLL or TUNE/FOLDER
knob to highlight the “Bri ...
