Nissan Rogue Service Manual: Brake pedal
Adjustment
BRAKE PEDAL HEIGHT
- Remove instrument lower panel LH. Refer to IP-22, "Removal and Installation".
- Disconnect the harness connectors from the stop lamp switch and brake pedal position switch.
- Turn the stop lamp switch and brake pedal position switch 45┬░ counterclockwise.
- Check that the brake pedal height meets the specification by checking the brake pedal and brake booster for damage and replace parts as necessary. Refer to BR-54, "Brake Pedal".
- Turn the stop lamp switch and brake pedal position switch 45┬░ clockwise.
- Connect the harness connectors to the stop lamp switch and brake pedal position switch.
- Check the brake pedal for smooth operation.
CAUTION: The stop lamp must turn off when the brake pedal is released.
STOP LAMP SWITCH AND BRAKE PEDAL POSITION SWITCH
- Remove instrument lower panel LH. Refer to IP-22, "Removal and Installation".
- Disconnect the harness connectors from the stop lamp switch and brake pedal position switch.
- Turn the stop lamp switch and brake pedal position switch 45┬░ counterclockwise.
- With the threaded ends of the stop lamp switch (3) and brake
pedal position switch (1) contacting the brake pedal stopper
bracket (2), turn the switches 45┬░ clockwise to lock in place.
Check that both the stop lamp switch (3) and brake pedal position switch (1) contact ends to brake pedal stopper bracket (2) clearance (A) are within specification.
CAUTION:
- Make sure that the clearance (A) between the brake pedal stopper bracket (2), stop lamp switch (3) and the brake pedal position switch (1) contact ends are within specification.
- The stop lamp must turn off when the brake pedal is released.
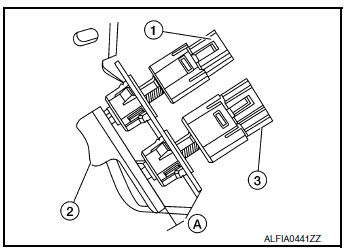
Clearance (A) : Refer to BR-54, "Brake Pedal".

 Brake fluid
Drain and Refill
CAUTION:
Do not spill or splash brake fluid on painted surfaces. Brake
fluid may damage paint. If brake fluid is
splashed on painted areas, wash it away with water imm ...
Other materials:
Engine control system
Symptom Table
SYSTEM ŌĆö BASIC ENGINE CONTROL SYSTEM
1 - 6: The numbers refer to the order of inspection.
(continued on next table)
SYSTEM ŌĆö ENGINE MECHANICAL & OTHER
1 - 6: The numbers refer to the order of inspection. ...
Text messaging
WARNING
Laws in some jurisdictions may restrict
the use of ŌĆ£Text-to-Speech.ŌĆØ Check local
regulations before using the feature.
Laws in some jurisdictions may restrict
the use of some of the applications and
features, such as social networking and
te ...
Fuel level sensor signal circuit
Component Function Check
1.COMBINATION METER INPUT SIGNAL
Select "METER/M&A" on "CONSULT".
Using "FUEL METER" of "Data Monitor", compare the value of "Data
Monitor" with fuel gauge pointer of
combination meter.
Does ...
