Nissan Rogue Service Manual: Diagnosis and repair workflow
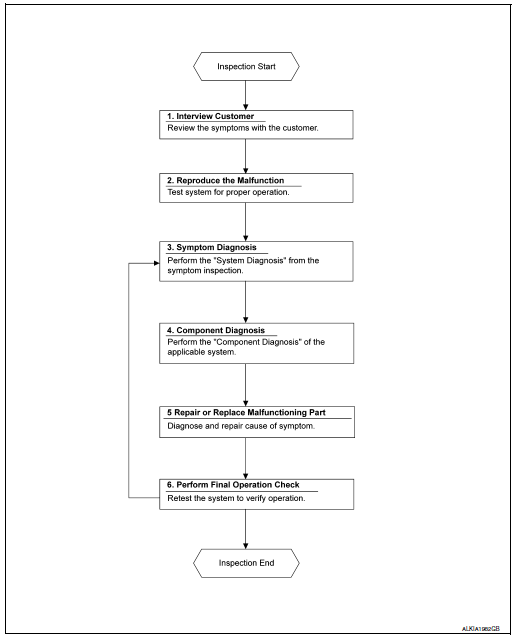
Work Flow
OVERALL SEQUENCE
DETAILED FLOW
1. OBTAIN INFORMATION ABOUT SYMPTOM
Interview the customer to obtain as much information as possible about the conditions and environment under which the malfunction occurred.
>> GO TO 2.
2. CONFIRM THE SYMPTOM
Check the malfunction on the vehicle that the customer describes.
Inspect the relation of the symptoms and the condition when the symptoms occur.
>> GO TO 3.
3. IDENTIFY THE MALFUNCTIONING SYSTEM WITH SYMPTOM DIAGNOSIS
Use Symptom diagnosis from the symptom inspection result in step 2 and then identify where to start performing the diagnosis based on possible causes and symptoms.
>> GO TO 4.
4. PERFORM THE COMPONENT DIAGNOSIS OF THE OF THE APPLICABLE SYSTEM
Perform the diagnosis with Component diagnosis of the applicable system.
>> GO TO 5.
5. REPAIR OR REPLACE THE MALFUNCTIONING PARTS
Repair or replace the specified malfunctioning parts.
>> GO TO 6.
6. FINAL CHECK
Check that malfunctions are not reproduced when obtaining the malfunction information from the customer, referring to the symptom inspection result in step 2.
Are the malfunctions corrected? YES >> Inspection End.
NO >> GO TO 3.
 Basic inspection
...
 Inspection and adjustment
ADDITIONAL SERVICE WHEN REMOVING BATTERY NEGATIVE TERMINAL
ADDITIONAL SERVICE WHEN REMOVING BATTERY NEGATIVE TERMINAL : Description
If any of the following work has been done Initial setting is nece ...
Other materials:
Front door glass
Exploded View
Front door
Front regulator
Front power window motor
Front door glass rear run
Front door glass front run
Front door glass
Front door glass rubber run
Removal and Installation
REMOVAL
Remove the front door finisher. Refer to INT-15, "Remov ...
How to follow trouble diagnoses
Description
NOTICE:
Trouble diagnoses indicate work procedures required to diagnose problems
effectively. Observe the following
instructions before diagnosing.
Before performing trouble diagnoses, read the “Work Flow” in each
section.
After repairs, re-check that the pr ...
Hood
Hood
Pull the hood lock release handle 1 located
below the instrument panel until the hood
springs up slightly.
Locate the lever 2 in between the hood and
grille and push the lever sideways with your
fingertips.
Raise the hood 3 .
Remove the support rod 4 and in ...
